Way back in 1949, a gentleman by the name of Dr. Helmut Haas is given credit for discovering a psychoacoustic phenomenon which was subsequently named the Haas Effect after his namesake, but is also called the Precedence Effect.
Psychoacoustics relate to how our minds perceive the audio our ears sense out in the world. There are a handful of these interesting cases that we've covered before, such as the Fletcher-Munson Curve.
Crafty music mixing engineers have realized they can exploit these special cases in order to make their work sound even more amazing, and the Haas Effect is probably the main one. It's popular enough that you may have even used it (maybe incorrectly) without knowing it's name.
Let's talk about what this effect is, how it differs from other common mixing techniques, why we would use it over those other techniques, and how exactly you would go about applying it to your mixes. It's the accumulation of these tricks that add up to an incredible end result, so pay attention!
What is the Haas Effect?
The Haas Effect is a binaural psychoacoustical effect that causes humans to hear two separate auditory events as a single sound when they are separated by a very short delay and are of similar volumes and wave forms.
Let's break that down. The word 'binaural' refers to how our two ears come together to help our brains perceive the location of a sound. In this case, sound localization occurs based on which of these two sounds we're referring to arrive at our ears first. This is why this effect is also called the law of the first wavefront.
To summarize, if two nearly identical sounds arrive at your ears within 5 milliseconds to 30 ms of each other and are within a 10 decibels volume range, you'll perceive them as one sound at the location of the wave form to arrive first.
The second sound still affects the perceived location, but not as you'd expect. Because it's still understood by our brains as one sound, you'll hear a widening of the sound across the stereo field although you can still pinpoint the exact location of where the sound is coming from.
Various studies have since occurred, but here's the safe numbers you can work with to achieve this fusion of two separate sounds into one:
- For short sounds like clicks: 1 ms to 5 ms
- For longer & more complex sounds: 1 ms to 40 ms
- Volume variation must stay within 10 dB to 15 dB
Short sounds would be instruments like a hi-hat or snare drum while longer sounds refer to complex waveforms with intricate timbre like vocals, piano, or guitar.
Now that we have the technical explanation out of the way, let's look at it from a non-scientist, musician angle so we can start to understand how we'll actually use it in our day-to-day work. There are some pitfalls, so please don't assume all is well.
Haas Delay vs. Panning: What's the Difference?
There's a few concepts to mention here that we'll tackle in what I think is the logical order. They are reverb, panning, and delay. We'll talk about how each goes into purposefully constructing the effect (because it rarely ever happens out in nature), also called the Haas Delay.
How Reverb Plays Into the Haas Effect
First, the reason why these two separate audio events sound like one is due to the same echo suppression we experience when mixing with reverb. When the delays (reverberation time) are short enough, it sounds more like a smearing of the sound than a delay.
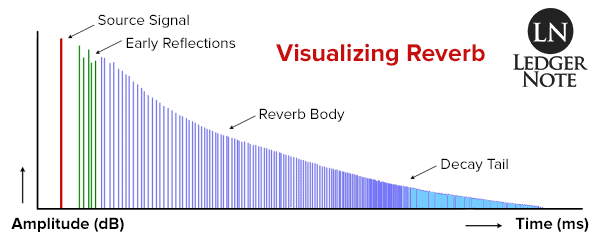
This smearing is what provides the width when the Haas Delay is in place. It doesn't sound like reverb because there's only one delay instead of hundreds firing off in rapid succession, so you don't hear the smear so much as you hear perfect clarity.
Isn't Panning the Same Thing as the Haas Delay?
Panning is close but not quite the same as a delay that effects sound localization. When panning, all you're doing is adjusting the volumes in your two speakers. If you pan to the left, the volume is gradually increased in the left channel as it's decreased in the right channel.
So, in the case of panning, you do experience the location of the sound shifting in either direction, but this is happening due to the change in amplitude. Loudness plays into localization, obviously, and with panning it occurs entirely due to the volumes with zero influence from delays. The way to remember this is that panning is about levels while delay is about timing.
the Precedence Effect is Entirely About Delay
Remember, we're controlling for variances in volume. In the studies they discovered that you could have a difference of up to 10 dB to 15 dB before the Haas Effect fell apart. When mixing, we'll keep the volumes exactly the same, so that's not even a part of the discussion.
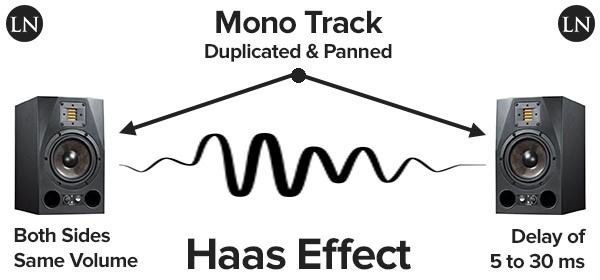
What we're really talking about here is a single, very short delay (below 40 ms as a maximum) applied to one of two identical sounds (we'll duplicate a mono track recording and pan them in opposite directions). This gives us a sense of width and an increased depth in the stereo field.
Why Use the Haas Effect in Mixing?
The only reason to reach for this method when mixing is to increase the sense of width of one instrument and to increase depth in the whole mix. And you should only even consider it when you're working with an otherwise sparse mix that might be too boring without it (in my opinion), due to the dangers we'll mention below.
Width - Again, by using a short enough delay that your two panned copies of the same track sound like one track, you also get the "smearing" effect of reverb that causes the track to have a widened presence across the stereo field.
Because you only have one delay versus tons of them like reverb, you maintain all of the clarity of it being a single instance of playback. But because the width now stretches across the space you've decided with panning, it gives context to other instruments in that area.
Depth - Depth is usually created using a decaying reverb tail or by juxtaposing one track against another at various volume levels. The point is, you have to have something to compare a track against in order to create an experience of depth. Empty space in the stereo field can't provide this, but your widened track can.
These are the two reasons you'll use this effect, and you shouldn't reach for it unless you have to. If you can record in stereo or record two independent mono takes, then you should do that. Otherwise you run into the problems mentioned below.
How to Use the Haas Method
To put this method into action, you'll take your boring mono track in a sparse mix and apply some very specific steps:
- Duplicate the mono track and pan both versions opposite of each other.
- Choose which side you want to be the location of the sound and add a delay to the other.
- Combat phase issues by detuning slightly with a pitch shifter.
That's how it's done. It sounds easy and is for the most part but let's break each step out into it's own explanation so it's absolutely clear what we intend on doing here.
1) Duplicate the Mono Track & Pan in Opposite Directions
Let's say you have a mono vocal track and a mono rhythm guitar track and the mix is extremely boring. In this case we'd duplicate the mono guitar and pan both versions in opposite directions, either left or right.
How you duplicate it is up to you. You can create a new track in the multitrack of your digital audio workstation (DAW) and copy the actual file to the new track. Another option is to create a send of the original track at full volume (unity) to a bus, which is probably what I'd do. If you need one, you might as well one of the best DAWs available currently.
How far you pan these apart is up to you. You don't have to push both to the extremes. You could move each about 50% in either direction, or one side to 50% and the other to 100%. Think about what is appropriate for your mix.
2) Choose Your Main Direction & Add a Delay to the Other Side
With your new track or auxiliary bus panned in the opposite direction as the original, choose which side will be the perceived location of the sound. If you decide the left should be where the sound is situated, then you'll want to add a delay to the right side and vice versa.

Hopefully you know how to drop a delay plugin onto your new track or aux bus. Remember to not go over 40 ms. I'd recommend playing with values between 10 ms and 30 ms. Too much beyond that and you start to experience a separation of the sounds.
3) Check for Phase Issues & Fix Them With a Pitch Shifter
Here's the tricky part. If you're mixing with headphones you won't notice any problems, but if you take the cans off and listen with your speaker monitors you may hear something strange happening. The two sides may be combining to sound real funky and not in a good way.
I'll explain the problem in the next section and how you go about detecting it and fixing it. Make sure you read it because you will undoubtedly run into these problems (every single time actually).
Watch Out for These Problems With the Haas Method
You will without a doubt run into phase issues when applying this method. It won't be full blown phase cancellation but you'll have some kind of comb filtering going on.
Phase Issues & Comb Filtering
This is where similar wave forms combine in such a way that their peaks and troughs amplify and cancel each other out with the result looking like the teeth of a comb.
The first question is how you even detect this problem, especially if your ears aren't attuned to noticing it. You can do one of two things. The first is to route the output of your original track and the new auxiliary bus to another summing bus created just to house the two panned mono tracks.
On this new bus you can drop a phase correlation plugin and let an algorithm do the work for you. It will detect any phase problems and show you how extreme they are on the user interface. This is the method most of you should probably use, but you should practice hearing the problem.
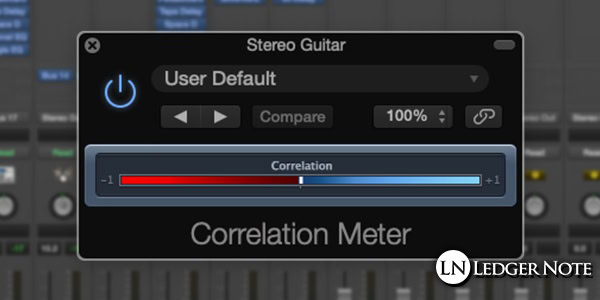
To have an easier time hearing the problem, you can use a trick for mixing in mono that will make sure you can detect the problem. You need a method to dropping your entire mix to mono, then you can solo the summing bus so you only hear the combined tracks but in mono.
Fix it With Pitch Shifting
At this point you should either be able to hear the phase problems or see them on the phase correlation meter. Take the side that you added the delay to and add a pitch shifter plugin to it.
Now loop the audio so you can hear it continue to play without you needing to hit play over and over, and start detuning the track with the pitch shifter. Make sure you're using cents and not entire octaves. You only want to detune the track as much as necessary to stop the phase problems.
Your end result should have no phase problems and such a slight amount of detuning that it's not audible when the entire mix is being played in stereo. Your tracks, in the context of everything else going on, will sound fine with no noticeable pitch shifting.
That's the Haas Effect AKA the Precedence Effect
You'll find no more thorough and applicable explanation of the question "What is the Haas Effect" than this article. I know because I just checked. Many will tell you how to use it but don't warn you about the phase problems that arise from it. I just covered it all and am patting myself on the back!
This effect is used in real life applications beyond mixing. It's in sound reinforcement systems in huge auditoriums, used in ambience extraction and noise reduction, and in multichannel audio decoding. There's even such a thing called a Haas kicker which never quite worked out, meant to make the sweet spot for mixing in the studio wider.
You can read one of Dr. Helmut Haas' original papers, The Influence of a Single Echo on the Audibility of Speech, at the Audio Engineering Society's digital library.
You don't need to wait to have the right sparse mix to try this effect out. Sometimes you'll need stereo guitars but only have a single mono track. That's a good chance to give it a shot, and with different amounts of distortion and pitch shifting you can dodge the phase problems that arise from the Haas Effect.
Jared H.
 Jared has surpassed his 20th year in the music industry. He acts as owner, editor, lead author, and web designer of LedgerNote, as well as co-author on all articles. He has released 4 independent albums and merchandise to global sales. He has also mixed, mastered, & recorded for countless independent artists. Learn more about Jared & The LN Team here.