
Let's say you're an accomplished guitarist who has been playing live for nearly a decade, ripping improvised solos alongside your band mates in your city's most celebrated cover band.
You realize you don't want to pretend to be a member of Talking Heads for the rest of your life, so you bring it up to your crew and they all confess the same. But rather than write original music, most choose to disband and get day jobs.
Luckily for you, you're an actual music theorist and have an album's worth of songs in the bag already. You sit down and meticulously create your backing tracks with high quality samples and MIDI sound fonts. And now it's time to lay down your first rhythm guitar tracks.
"Holy crap," you think as you discover you're way out of time and resigning yourself to a second take. But you keep listening and realize you're out of sync by the exact same amount of time across the entire section of the song.
How can his be? You've just had your first run in with latency in audio recording, something you didn't deal with during your gigs and practice sessions.
Let's figure out exactly what's going on, define the problem, and present the variables you can tweak to reduce latency as much as possible.
What is Audio Latency?
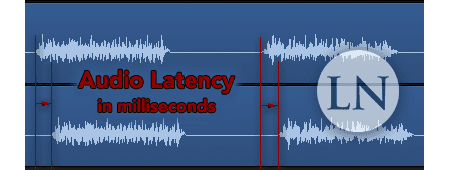
In summary, audio latency is a time delay, usually in tens of milliseconds, between the creation of a sound and its playback or recording.
That sounds confusing and it is because it's a general definition to catch all of the various types of latency.
Consider standing at the Grand Canyon and yelling "Hello?" and waiting a few moments before hearing your own voice bounce back to you. That is one form of latency that you encounter in live performances in large venues.
If you're far enough from the stage, you'll see the guitarist pick a note but you won't hear it till a moment later. This happens due to the difference between the speed of light traveling faster to your eye versus the speed of sound playing catch up to your ears.
These forms of latency aren't an issue because all sound sources are afflicted by the same amount of delay. The type of latency you'll deal with as a recording engineer will involve the accumulated delays that result in playback monitoring slightly lagging behind the other tracks that already exist.
Even though this may only be a fraction of a fraction of a second, it can ruin a performance by confusing players or at least make them sound horrible to the audience.
Let's talk about these various points where a tiny bit of delay is added over and over until you have a noticeable problem.
What are the Causes of Audio Latency?
You're going to deal with two types of latency that create issues while recording and also while mixing after the fact.
One is a mismatch in the timing of hardware monitored audio versus its accompanied software produced audio.
For instance, when a vocalist is wearing headphones so she can hear her own voice as she sings along to the instrumental of her song, she may notice an annoying delay where the instrumental drags behind her live performance.
The reason for the delay is that her voice is being piped right from the mic and out through the headphone amp on the audio interface entirely on a hardware level, but the instrumental is traveling from the DAW software through the digital-to-analog converter in the interface and then out through the headphones.
So not only do you have varying lengths of cables (which aren't huge contributors to the problem), you have the time of the DAC calculations creating the lag.
Add in something like a MIDI keyboard player using a software plugin synthesizer who's notes have to travel through the converter twice, be calculated by the plugin, share the audio buffer and the overtaxed CPU and you can see how quickly your playback experience can be thrown into disarray.
The second type of latency is a mismatch between the timing of an audio recording and how it actually 'lands' on the multitrack in your digital audio workstation.
This type is usually minuscule and unnoticeable, because you're really only dealing with the difference between the input and output latencies, which is far less than either one alone. If it is ever a noticeable amount, you can simply bump the track by a matter of milliseconds to line it up with the rest of the song.
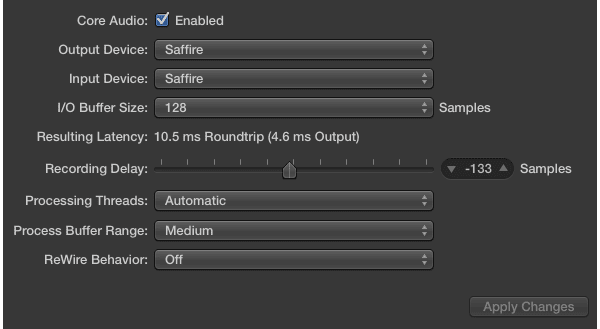
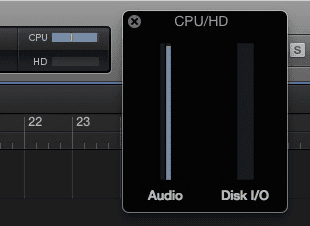
If you discover that your input latency is a consistent amount, such as 133 ms, you can instruct your digital audio workstation to always bump your tracks ahead by that much, called 'delay compensation.'
For example, the image above shows this process in Logic Pro X. It also calculates your overall latency for you. If it is negligible you can ignore it altogether.
How to Achieve Low Audio Latency
The best way to understand each point of latency and how to correct it is through laying out various scenarios centered around each one. Then we can suggest a solution that particular problem.
Headphone Monitoring Latency
Lots of us record straight into our laptops using the onboard sound card to take the microphone input, deal with that inputted sound, and then push both the new sounds and the backing tracks out to us through the headphone jack.
This makes it nearly impossible to record anything intricate, such as a piano solo or fingerpicking on a guitar due to the mismatch between you plucking a string and actually hearing it played back.
In this case, the solution is to score an audio interface that has a zero latency monitoring system (also known as 'hardware monitoring') that will route the sound the microphone picks up and push it right out of the headphone output on the interface, completely dodging the converter and computer software.
This is preferable because you'll have access to a preamplifier for the microphone, which is non-negotiable for any microphone. USB microphones have them built in, but they're cheaper and lower quality.
Another plus is you can choose an interface with multiple inputs, outputs, MIDI jacks, and more. If you need to explore this path, check out our picks for best audio interface in various budget ranges.
CPU / Buffer Balancing
Let's say you're the keyboardist in your band and the only member lugging around a laptop to use software plugins instead of guitar pedals or rack-mounted sound banks. You've got MIDI cables heading to a MIDI-to-USB adaptor and then an output from the sound card to your monitoring amplifier.
The sound guy then hooks into the output of the amp to run you into the mixer with the rest of your band. Everything you play is about 1/4th of a second delayed and unlistenable.
First and foremost, let me point out that there are a few prerequisites here. We're assuming you aren't using an ancient computer with a hard drive with slower than 5400 RPMs, a CPU that can barely handle checking email and browsing the net, and that you aren't sitting on something with less than 4 GB of RAM. If you're desktop or laptop is relatively new, since 2010 or so, you're likely okay in this department.
The other issue is that you need to ensure that you've installed and chosen the correct drivers for your audio interface or digital mixer in your DAW. Using any pre-installed generic drivers or whatever is default chosen for plug-and-play USB ports is going to cause miscommunications and latency problems.
Drivers are like the bridge between software and hardware. Usually the recording interface will come with an installation disc or directions to go to the manufacturer's website to find the drivers. Make sure you take care of this!
The obvious solution would be to stay in the hardware realm and use a hardware synthesizer and racked sound banks from popular keyboards. But we're not all made out of money, so we've got to figure out how to find the balance between the CPU and the buffer so we don't get kicked out of the band.
You're in a pickle, because you likely need a high buffer amount in order to offload some work from the CPU, but this increases latency. You'd use a lower buffer and make the CPU work harder but the problem here is that the CPU has to live calculate all of the equalization, compression, flanger, and reverb effects you're running through.
That's not even considering grabbing sounds from the hard drive and storing it in the RAM, directing traffic in and out of the DAW, etc.
You'll have to experiment with the settings we discuss in the next section to find the sweet spot, and if it's not good enough you'll have to give up some effects. Reverb is a demanding one that you can move to a foot pedal.
That one inexpensive change could make the difference. The other option is to purchase a computer with a much faster and powerful processor and more RAM, but again that's hardly ever an option.
Recording Latency
As shown above, if you find that you're experiencing a consistent amount of latency between your performance and how it appears in your multitrack, then you can tell your DAW to apply a 'delay compensation' of that amount.
It will automatically nudge your tracks forward for you by that amount of time. It is possible in the best DAWs to set up delay compensation for individual plugins and tracks as well. Here is an example of making this happen in Logic Pro X.
Understanding Audio Buffer
There's a boatload of work going on in every part of your computer in order to record or playback a constant stream of live audio, and even more so once you start tacking on effects like reverb.
Without a buffer it would be impossible to keep this stream flowing smoothly without errors, but with a buffer comes the unavoidable problem of latency.
Your DAW provides you with buffer settings that instruct your computer's RAM to partition off a portion of this memory for use in storing a part of this constant stream of audio samples. That begs two question, which is 'what are audio samples?' and 'what buffer setting options are available?'
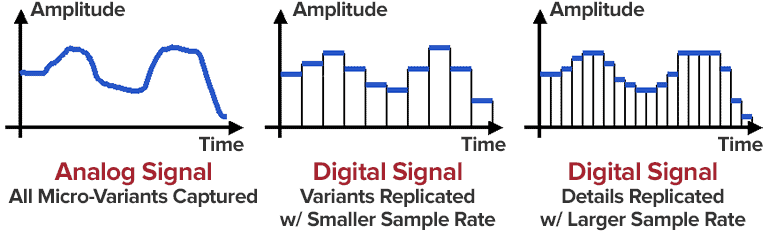
As seen above, samples are 'thin slices in time' of audio that are converted into digital information. The higher the sample rate, the more (and thinner) of these slices are captured, which leads to a higher resolution of audio, like cramming more pixels into a high definition television.
You'll generally record in 44.1 kHz (the playback sample rate for CDs and more than good enough) or 96 kHz if you want to ensure you have the highest quality source material possible for mixing and mastering.
For live audio you do not need to use a 96 kHz sample rate. The Nyquist Theorem basically states that you can capture and reproduce sounds at half the frequency of the sample rate.
So with 44.1 kHz, you can reproduce frequencies up to 22 kHz, which is above the general maximum for human adults at 20 kHz. So save the processing power and don't go above 44.1 kHz when playing live or when recording on a weak computer.
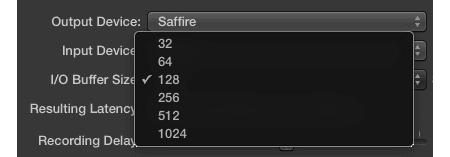
So your buffer options come in 'buffer sizes,' which are typically (in samples):
- 64
- 128
- 256
- 512
- 1,024
- 2,048
These numbers are the amount of samples your buffer will hold in order to buy your CPU time to do its calculations. The 'resulting output latency' can be calculated and reported to you, like in the image near the start of this article, thanks to the static sample rate value and the chosen buffer size.
So obviously the more 'slices of time' you're storing, the more latency you're introducing. But depending on the power of your CPU, this may be necessary.
The Math: 256 samples of buffer at a 44.1 kHz sample rate gives us a latency amount of 256 divided by 44,100 Hz, which is 0.0058 seconds or 5.8 milliseconds.
If you try to use a buffer rate that's too fast and your CPU can't keep up, you'll get tiny gaps in audio where your computer forfeits some samples in order to play catch up. This will sound like clicks and pops in your recordings and playback, clearly as bad of a problem as too much latency!
In 2017, the year of this writing, my estimation is that only the best computers available should even consider a buffer size of 64 samples. My computer is a beast and I stick with 128 samples because it's an unnoticeable amount of latency for me at 4.6 milliseconds.
Most average computers with a bottleneck in the CPU or RAM should stick with 256 or 512 samples, especially if you're using a lot of software effects like the synthesizer example above.
Anything above 512 samples and you might as well forget live performance and real-time monitoring. You can still record, but trying to do so in time with a backing track will be impossible.
What is an Acceptable Amount of Audio Latency?
When we talk about acceptable latency values, we're strictly talking about the amount of delay during monitoring. These are values that will, if exceeded, disrupt the ability of the musician to play in time due to noticing the delay.
Vocals: You want as little delay as possible, with the preferable option being using hardware monitoring and the least preferable being wearing only one side of the headphones. The problem here is one of consciousness and the brain being able to hear our voices even if we aren't vocalizing.
Our minds will anticipate our voice coming out, and if it doesn't line up with what our ears hear perfectly, it's going to create problems for the vocalist. Try to keep it at 2 milliseconds or less, if not zero.
Electric Guitars: We're used to playing several feet away from out amplifiers, which introduces a natural amount of delay thanks to the speed of sound being relatively slow. You can generally take the average distance in feet that a player typically stands or is seated from his or her amplifier stack and let that be the acceptable latency in milliseconds.
So if you're used to sitting on your bed, five feet from your amp, then 5 ms of delay will sound normal and not disrupt your playing. If you're miking an acoustic guitar player or any other stringed or brass instrument then you need to use hardware monitoring to achieve zero latency.
Drums & Percussion: Try to keep it at 5 ms or under. This is in the realm of perceiving an instrument as sounding off immediately and will keep their rhythm in time. Any slower and their playing will stop being automatic as they try to anticipate or compensate, which will cause a lot of mistakes in their playing.
Keyboard & Piano: With pianos there's always the delay between hitting a key, the hammer hitting the string, and the string's vibration traveling to your ear. So as much as 5 to 6 milliseconds will be fine. With keyboards, the amount should be the same unless they're playing pads, in which case you can get as high as 20 milliseconds without them or the crowd noticing.
Audio Latency Sucks But Can Be Solved
Latency sucks. In most cases of recording you can minimize its effects either in the DAW or with hardware monitoring in your analog mixer or recording interface.
When using a computer for a live performance, your options are limited depending on the amount of plugins you're using. Offload as many as you can, if not all of them, to rack-mounted effects units or foot pedals so you can reduce your buffer size in the DAW.
While it's not a complicated issue, it is one that is unavoidable. It is a built-in aspect of digital recording, one that not even the most elite professionals can evade. That is the unfortunate, but tolerable, problem of audio latency.
Jared H.
 Jared has surpassed his 20th year in the music industry. He acts as owner, editor, lead author, and web designer of LedgerNote, as well as co-author on all articles. He has released 4 independent albums and merchandise to global sales. He has also mixed, mastered, & recorded for countless independent artists. Learn more about Jared & The LN Team here.