
The best vocal compressor for voice, bass, drums, and any other audio signal is the topmost studio-quality one you can afford. I'll say it very plainly: You cannot achieve a recording or a mix that matches what you hear on professional releases without a compressor. If up till now you've only had access to software compressor plugins, snagging a hardware compressor is going to change your life, especially when it comes to the recording stage of music production.
The following review may contain affiliate links which may earn us a small commission when you click on them, at no extra cost for you. As an Amazon Associate we earn from qualifying purchases.
You simply cannot and won't achieve a recording and mix that matches what you hear on professional releases without a compressor.
If you're here reading this then you already know that. But what many of you may not know is exactly what a compressor does, how it does it, and how you control it in order to make it do it! It's such a confusing topic that even that sentence is confusing.
But if you truly know the deal with these miracle machines, then feel free to scroll down and get to our suggestions below. But if you're unsure or need guidance about which type of compressor you need, take the time to read our FAQs section so you can make an informed and confident decision.
Click here to visit our FAQs section
We've had the good fortune to be able to try and hear all of these. If it's on the list, it's more than good enough! Before you dive in - let us give us some additional reasons on why you need a compressor and why you need the best you can afford.
Top 10 Reasons to Buy the Best Vocal Compressor You Can Afford!
- You're recording and want to avoid clipping and not lose that perfect, un-replicable performance!
- You're recording live takes to reel-to-reel, cassette, or using a multi-track recorder. One mistake ruins everything for all of the band members.
- You're involved in live shows. Give the sound guy a signal he can work with that the audience will love. You never want to peak live!
- It looks amazing on stage or in the studio. Wow people with it, because marketing matters!
- You want to mix outside of the box with hardware so it's hands-on (and arguably a better result).
- You mix in-the-box but want to bounce stem groups through one for some glue and saturation.
- You record sources with unpredictable levels and need to tame the volumes to make it usable and listenable.
- You record tame sources in ambient situations with lots of noise you want to gate out or background tracks you need to duck out.
- You have G.A.S. (Gear Acquisition Syndrome) and want another toy to play with! (This is totally a legit reason, by the way).
- You realize this is non-negotiable. You have to have one to produce the best recordings and mixes. The final product is what people hear and you want to make it right, like the professionals do.
Included in this guide:
| FMR Really Nice Compressor | Best for Beginners | Buy on Amazon |
| DBX 166XS | Best Multichannel Compressor | Buy on Amazon |
| FMR Really Nice Leveling Amplifier | Best for Vocals and Bass | Buy on Amazon |
| DBX 160A | Best for Kick and Snare | Buy on Amazon |
| Art PRO VLA II | Best All-rounder | Buy on Amazon |
| WARM Audio WA76 | Best Value for Quality | Buy on Amazon |
| Summit Audio TLA-50 | Best for Kick and Bass | Buy on Amazon |
| Teletronix / Universal Audio LA-2A | Best Compressor for Studios | Buy on Amazon |
| Universal Audio 1176 LN | Best for Hard Rock Vocals | Buy on Amazon |
| Rupert Neve Design Portico 543 | Best for Vocals and Guitars | Buy on Amazon |
| Empirical Labs Distressor | Best Harmonic Enhancer | Buy on Amazon |
| Avalon VT-737SP | Best Overall | Buy on Amazon |
FMR REALLY NICE COMPRESSOR
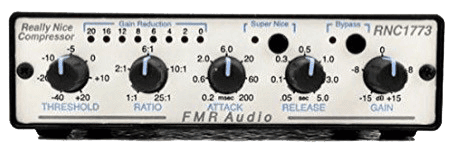
The FMR RNC is the best entry-level compressor hands down. It hangs with all of those in the $500 range as well. FMR cut costs everywhere they could, including placing the electronics in a 1/3rd rack-size and using plastic instead of metal for the chassis.
Don't let this fool you. Like their preamp, the "Really Nice Compressor" is more than really nice. And you can score a Funklogic faceplate if you want to mount it in your rack along with another RNC, an RNP, or an RNLA.
This is a single-channel compressor with all of the options you expect from a professional grade compressor, but it also features a second path of electronics called "Super Nice." Super Nice mode runs your signal through three compressors in a row at lighter levels. This makes sure you don't have any strange transients slipping through if you're sending in a crazily dynamic signal.
I placed this first on the list so you'll know, this is the one you want if you have a low budget. It's a transparent compressor, meaning it adds no extra flavor or coloration. It reproduces your signal completely and faithfully.
I have access to tons of compressors and I still use my RNC as the choice for slight compression during tracking and still love it for heavy compression during mixing. If you want more color than transparency, check out the RNLA below by the same company.
DBX 166XS

The DBX 166xs is the lower cost, two channel version of their 16- series. What's nice here is that you have the option to record stereo signals or you can record two separate mono signals at once. This one also features an expander along with a gate (which we discussed before).
An expander is like the inverse of a compressor. It boosts your signal below the threshold if you prefer that than over-compressing the louder portions. A mix of both is nice if you're looking for a really smashed signal instead of crushing the louder parts.
This is the kind of compressor that you'll be happy you bought even later if you upgrade to something higher-end. These are great to have around when it comes time to track drums live. It's hard to collect enough expensive compressors and it's not necessary on drums tracks and other instruments that aren't the focal point of the song.
What else is neat is that you can engage a separate limiter on top of the compression at the same time. This lets you safely track dynamic sources live without having to heavily compress if you don't want to. Anything that slips through entirely too loud will get caught by the limiter and you won't clip.
FMR Really Nice Leveling Amplifier
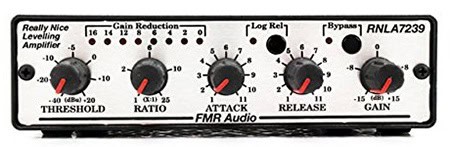
The FMR RNLA is their leveling amplifier version of the RNC. It runs a different compression algorithm that doesn't respond to fast transients as quickly (note the attack and release values around the dial), but works fantastic on vocals, bass, and anything else.
I wouldn't use it on drums since I have other options but you certainly could, but some initial transients might slip through. The main difference beyond that is that, compared to the RNC, this isn't transparent at all.
The RNLA's compression applies a very warm coloration to the signal that a lot of people have described as "gooey," which refers to the ability to glue tracks together. For instance, if you used this on a set of stems together, it would help them all feel like they sit together better instead of isolated in the sonic soundscape. It's hard to explain if you haven't heard the effect. It's something mixers seek a lot of the times.
If you're looking for a compressor for vocals, this will make your voice sound like those old, warm R&B style vocals you'd hear on records in the 70's and before. It's a nice addition in the midst of all of this crystalline brightness of the digital age.
DBX 160A

DBX has been in the game forever and are constantly revamping their models by tagging new letters on the end. It's hard to keep up with, honestly. The DBX 160A is patterned to match their classic 160X and XT models from the 70's.
This is where you start finding some additional features you don't get on less expensive compressors. For instance, you have the option to change the knee from OverEasy to Hard Knee curves. The knee is how fast the compression ratio reacts, but not like the attack.
The softer the knee, the slower the transition into compression happens. It doesn't wait like the attack setting tells it to. It starts immediately but the process is smoother instead of sudden if you choose a soft knee (more transparent).
You've got insert options if you want to sidechain an EQ to act as a de-esser. There's also an "INFINITY+" option that helps ride the gain to keep you from peaking (versus simple limiting), which can be helpful for live mixes at a concert. The one thing I do like about this is the minimalistic design of the faceplate, saving room for plenty of LED's to show you your gain reduction.
Art PRO VLA II

The ART Pro VLA II is a commonly used option for compression. It features two independent mono channels (two compressors in one!) or with the press of a single button you can link the two channels for true stereo compression.
Interestingly, you get the old school VU meters up top and the expected gain reduction lights along the bottom. It looks impressive to see those flicking on and off and back and forth, if you want to amaze your clients.
This bad boy is an optical compressor with a hard-coded soft knee. This means, while the compression itself is very transparent and realistic, it does add a pleasant color to the signal. The harder you drive the signal, adding gain and more compression, the more obvious this coloration becomes. That's something a lot of mixers will seek. These flavors are subtle though and not something to worry about if you're not sure.
Typically, solid state and transformerless compressors are transparent. This one and others that feature vacuum tubes will add a subtle saturation of harmonic distortion, which is what people call "color."
Having one of these types, and specifically the VLA II, can be great as a general all-purpose compressor that behaves well on vocals, bass, and drums. This particular comp is considered a great purchase for the price due to this value it provides.
WARM Audio WA76
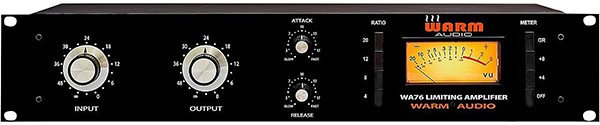
The Warm Audio WA76 exists to bring the flavor and sound of the classic 1176 (featured below) to the world at a more affordable price. Warm Audio rocks. They are a fairly new company comparatively and jumped right into the big leagues. Everyone loves them and you will too if you choose to give it a whirl.
This bad boy is a hefty beast. It takes up two units of your rack for a single channel of compression due to the juicy transformers inside. As a matter of fact, there are those who will run their signal through this compressor with it on bypass just to color the signal with the transformers. They don't call themselves Warm Audio for nothing!
Like a lot of other Limiting Amplifiers (as opposed to classic compressors), you don't set the threshold. You drive the input gain to achieve the gain reduction you're seeking. Notice the buttons to the left of the VU meter labeled Ratio. You do get to control the ratio but only at 4, 8, 12, and 20 to one ratios. 20:1 is essentially a limiter setting.
The other settings are your generalized amounts. Remember, you're controlling the gain reduction through the input by pushing the signal up to the threshold, not so much the ratio here or bringing the threshold down to the signal.
This is a true winner for those looking for a solid color to add to their signal or even mix-bus during mastering.
Summit Audio TLA-50
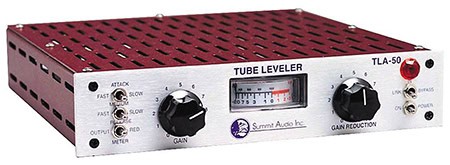
The Summit Audio TLA-50 is literally a tank hiding within a steel chassis. It's a half-rack unit that can be paired with a second version of itself to record stereo signals if you want. Just like other high-end compressors, the options are simplified and the values around the knobs are vague so you're made to mix with your ears and not your eyes. It's the affordable version of the TLA-100 that's about three times as costly.
The attack and release have two choices: Fast or Slow. The bottom switch on the left-side asks you if you want to meter the output or the gain reduction. This is also a Leveling Amplifier, meaning you're not going to change the threshold, only the input gain and the compression ratio (here it's labeled as Gain Reduction on the big knob on the right). This beast uses a vacuum tube in its hybrid circuitry to add some warm coloration.
This compressor really shines on single sources, especially with the sidechain option available. The fastest attack is still not quite as fast as others, meaning that it may not be the best choice for mixing drums the way it's done right now in pop and heavy metal for instance. But if you're on the hunt for a great vocal or bass compressor, you're looking at one right here.
Teletronix / Universal Audio LA-2A
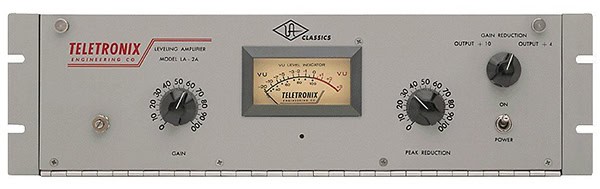
The Teletronix LA-2A is one of the most well known and respected leveling amplifiers ever. It's even in a technology hall of fame. There are three versions out there floating around still widely available (but used) depending on who owned the company at the time. You've got Teletronix, Babcock Electronics, and UREI, but they are all the same LA-2A goodness.
Notice the lack of options. You don't need them or want them here. The attack time is hard set at 10 milliseconds while the release is about 60 millseconds up to 50% and then the last half of the release is anywhere from half of a second up to a full second. The left-most knob is your makeup gain at the output to keep your gain staging in check after compressing.
The Peak Reduction pot lowers the threshold lower since the compression ratio is fixed at 3:1. The smaller knob on the top right has three settings that control the VU meter. The middle setting lets you monitor your gain reduction while the outer settings let you view your output levels at different metering scales.
Recording and mix engineers love this thing for it's unique warmth it adds. You'll see other terms thrown about like "fat" and "big" which are both subjective but describe a very real flavor this comp adds. You can drive the input signal real hard to achieve an interesting distortion as well. This can sound nice with bass and really complement a mix, helping it stand out.
Most of the time, this is the compressor that everyone considers the best available. It's the holy grail.
Universal Audio 1176 LN
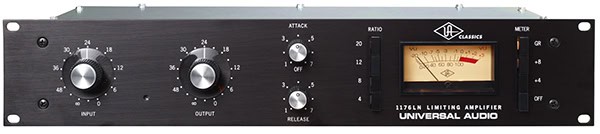
he Universal Audio 1176 LN is arguably the best or second-best compressor ever (depends on who's arguing!). This leveling amplifier has gone through various upgrades over the years since 1966. Ultimately, we ended up with the FET version with the LN designation...
FET stands for Field Effect Transistor which Bill Putnam felt was an improvement over the valves he was using, which moved it into the realm of solid state electronics for faster and more precise attack and release settings. Eventually more was added to reduce the noise floor, which is what the LN stands for: Low Noise.
You don't control the threshold on this one, just the input gain, ratio, attack, and release. You do have the option to monitor the gain reduction or the output levels, which is a nice convenience for gain staging purposes. It should be mentioned that you have your typical four choices for ratio settings like other leveling amplifiers. You can choose 4, 8, 12, or 20 (turning this bad boy into a limiter!).
This is as transparent as they come, versus the LA-2A above which is extremely colorful. So determining which is better is entirely based on which flavor you like. I say, in my perfect mental utopia, you should have both! If it's one or the other... you won't go wrong with either.
But you can always add color, but not remove it. That's one argument for going transparent. In the end, your listener won't care or know. This is just stuff the pro's argue about! You simply can't lose on this one. It can compress anything perfectly.
Rupert Neve Design Portico 543
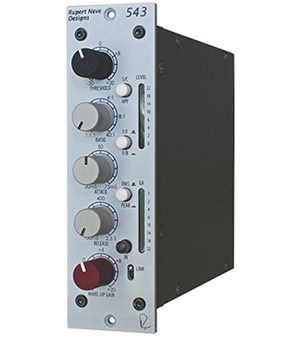
If you haven't heard of Neve then you aren't doing your research! The Rupert Neve 543 is the version of their giant mixing console compressors for the rest of us who don't have or need a big board like that. The company decided to use some more modern advancements in their Portico models than completely replicate the old line-up.
Although this is a VCA compressor, the feed-forward mode allows the attack to be as fast as any other compressor. With independent gain reduction and output level monitoring, you're in complete luxury land. There are dozens of Neve clones for each of their models, regardless if we're talking about comps or pre's, but you'll never nail the perfection and luxury of an actual Neve.
Further luxuries include a bypass button, RMS versus Peak detection modes, Feed-forward versus Feed-back detection, and also a high pass filter at 250 Hz for the detector (so bass doesn't trigger the compression).
Those who've had the pleasure of using this compressor hail it as the most transparent compressor ever. Combine that with the RMS detection and you can use this on any signal or switch over to Peak detection for scalpel-precision detail work. You simply can't lose with this winner.
Empirical Labs Distressor

The Empirical Labs Distressor is another of the most respected and sought after compressors. It comes in various models such as the EL8, EL8-X that includes a "British Mod," and the EL8-S stereo pair. While most of the classics were invented in the 60's and 70's, the Distressor came on the scene in 1995 and immediately solidified it's spot at the top.
It's hybrid circuitry provide serious control on the digital side yet still provides some color on the analogue side. You'll read a lot of people praising this one for drums and bass, but just as many people use it on vocals, synthesizers, guitars, etc.
It's truly universal in its usage and appeal. Beyond this, it's also able to stand up to extreme compression which makes it a go-to for pop and electronic mixers who want to breathe some analogue life into the computerized genres.
Perhaps the most unique and interesting features are the Detector and Audio buttons. You can tell the peak detector to ignore the bass by engaging a high pass filter. You can also apply a true high pass filter or two modes of distortion as well.
The only thing I wish the Distressor did have was an ability to monitor the output levels as well as the gain reduction. That's okay though, you can just watch the input values on the next piece of gear or at the converters.
Any version of the Distressor is the bomb... if you can afford the stereo pair then all the better! You can unlink them and have two mono channels too. You do that and you'll be sitting among the studio elite.
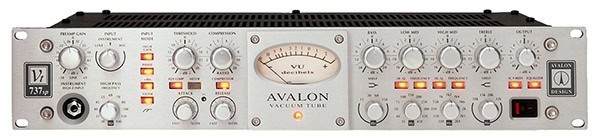
Avalon VT-737SP
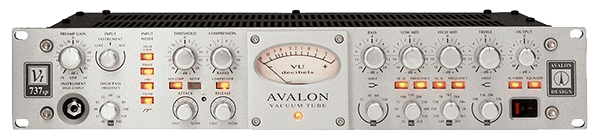
In my opinion, the Avalon VT-737sp is one of those pieces that every studio should have at least one of. It works on any source and works well. It's a channel strip that features a preamplifier, a compressor, and an equalizer.
The preamp made our list of top pre's and we're featuring it here for its comp too. You can score two solid pieces of gear in one along with their very respectable EQ as well.
There are various versions out now with a new black faceplate and a Babyface version, but they're all essentially the same. First, your signal is going to pass through the preamp electronics that feature four vacuum tubes and then two more in the compressor.
When we say warm, we're talking very warm here! It's perfect for any source but I feel this guy really shines on vocals and bass.
What's cool is you can link it with another for stereo. What's cooler is that you can use the EQ with the compressor as a de-esser with the sidechain switch or leave it in 4-band mode. If you're a vocalist on the hunt for a compressor and you don't have a top-notch preamp yet, definitely go for this.
You won't believe the difference when you pair it with any microphone (and especially with a high quality mic). The price isn't nearly as bad as you'd expect for such a master work of engineering and art.
Pop, R&B, and Rap vocalists should give this heavy consideration. For an all purpose channel strip, it's the best vocal compressor out there.
FAQs
What is an Audio Compressor & What Does it Do?
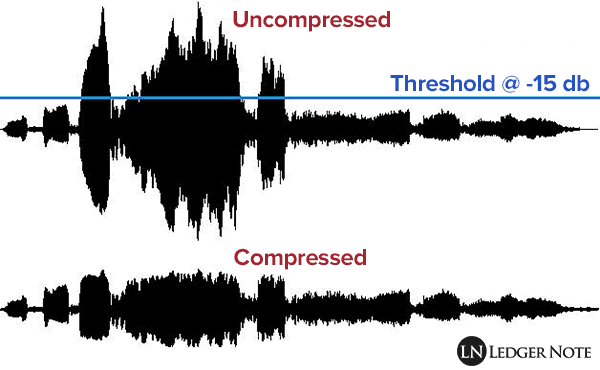
All audio is an electrical or digital signal. Studio recording and mixing boils down to how we capture this audio and then how process the signal in order to promote a pleasant, clear listening experience. A compressor is a key component in balancing the varying amplitudes to remove some dynamics.
What this means is that a compressor is designed to lower the volume of the loudest parts of your recording so that they more closely match the quieter parts so that everything can be heard more comfortably. The nuances are essentially raised in volume in this way so all of the details can be heard.
Beyond this basic yet all-important task, it can also be used to sculpt the signal to promote or hide specific details in your signal, such as making sure the initial smack of a snare can be heard or hiding the ear-piercing sounds of sibilance and plosives. Compressors can also function as noise gates and limiters as well...
Are These the Same as Limiters & Gates?
Yes. They are one and the same. There are three different labels based on what the compressor is set up to do, but in the end they are all compressors. The differences have to do with how you set up the threshold and ratio, mainly.
With a limiter, you'd set the threshold at a high amplitude with the highest ratio possible. This essentially blocks the signal from rising above that threshold, limiting the maximum volume allowed. A noise gate is kind of the opposite.
Unless your signal rises above the threshold, then no other sounds can get through. So with a gate you'd set your threshold just above the noise floor. So when only static and ambient noises can be heard without the desired signal like the singer's voice, it simply mutes everything.
What is this SideChain that people talk about?
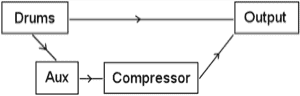
Sidechaining a compressor refers to the compression of your main signal based on what's happening in a second signal. So when the second signal crosses a specific threshold, it applies compression to the main signal. Here's a couple examples and a diagram:

In TV, radio, and theater productions where the main attraction is the voice of the speaker or singer, you can automatically "ride the fader" of all of the background music and sounds with a sidechain compressor.
This is called ducking. You're ducking (turning down the volume) the background sounds out of the way of the lead vocals whenever the vocals are playing.
A very common mixing practice when dealing with bass and kick drums is to duck the bass whenever the kick fires off. This is an easy way to make sure the kick can be heard clearly since they both exist in the same frequency range most of the time.
Equalization can only get you so far, but ducking the bass out of the way of the kick's attack can help the listener's brain latch on to the kick. This can be done with any compressor as long as it features an insert input/output.
How About Parallel Compression?
This is another advanced mixing technique that requires a compressor. There are lots of genres of music where varying dynamics are necessary to maintain the emotional breathing of the performance.
The game becomes keeping these dynamics while also making sure the details can be heard clearly. This is where parallel compression comes in (sometimes called New York Compression):
What a mixing engineer will do is split the signal into two and lightly compress or not compress at all one version of the signal. Then he or she will aggressively compress a second version.
They will then bring the two signals back together and balance the volumes so that the quietest but important details can be heard while allowing the original take to vary in volume.
What Does Each Knob on a Studio Compressor Do?
This is a summary of which an entire short book could be written. Please check out our full exploration of compressors if you want to dig deep.
You have four main settings available to you:
- Threshold
- Ratio
- Attack
- Release
Threshold: This knob features volume settings in decibels from anywhere around -40 dB up to +20 dB to accommodate all ranges of recording materials such as tape and digital hard drives. The threshold is the line you draw in the sand in terms of volume. If the signal crosses above the threshold, compression is applied.
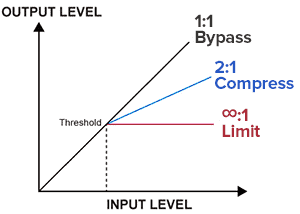
Ratio: This determines how much compression is applied. It may range from 1:1 (no compression) up to 25:1 (limiting). As an example, let's say you're choosing a 5:1 ratio for vocals.
This means that for every 5 dB that the signal goes over the threshold, only 1 dB will be allowed through. If the signal goes 10 dB over, then it is reduced to 2 dB based on this same ratio.
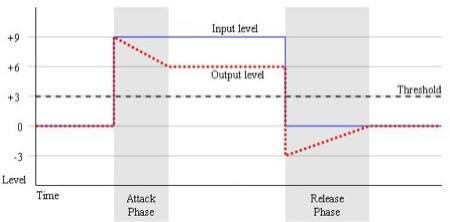
Attack: The attack is how fast the compressor reacts to the signal jumping over the threshold. It may range from 0.2 millseconds up to 300 ms. The fastest setting means "immediate" while you may choose a slower attack so the initial transient of the instrument can come through before compression clamps down on the rest.
Release: This refers to how long the compression is sustained after the signal drops back below the threshold. You can set it to be immediate in terms of milliseconds or hang on for several full seconds. Too fast and you may hear a weird pumping sensation. Too slow and you'll create end up creating constant fade-outs.
Of course you also have options like Gain, which is a volume control for your final signal leaving the compressor, and Invert, which can flip the phase of the signal for you which can help in stereo recording. The gain is important to make-up the overall volume you've reduced to maintain your proper gain staging.
What Types of Hardware Compressors are Available?
When it comes to compressors, you've got five basic types:
- Desktop
- Rackmount
- 500 Series
- Channel Strips
- Software Plugins
We're not going to talk about software plugins, which attempt to emulate hardware compressors. Each of the hardware types perform their job in different ways, such as optical compressors that convert the electrical signal to light and manage the intensity of the light, and pure electronic ones.
I wouldn't worry too much about all of that since most are electronic anyways. The thing to worry about is the form factor as mentioned above.
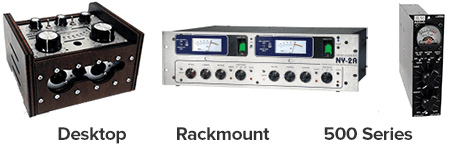
Without beating this horse again since we've done it in so many articles before, the entire point is that you need to decide the shape you want your compressor to come in. If you intend on only ever buying a single compressor and not a lot of other gear, you may be happy with a single channel desktop box that sits right on your desk.
Otherwise, if your'e going to acquire a lot of various studio gear, you should consider the standard 19" rackmount form. It screws into a cabinet along with the rest of your preamps, equalizers, etc. There is also the 500 Series that screws into a tiny rack called a lunchbox.
A lunchbox can either be portable or itself can mount into a larger rack. Rackmount compressors will generally feature one or two channels, while 500 Series feature one channel, requiring you to buy two of the same model if you want to capture and compress a stereo signal.
And finally there are compressors that are inside of channel strips. Channel strips are typically come in the rackmount shape but are taller and may require two or three units of your rack space.
They include a preamplifier, a compressor, and an equalizer in serial form so you can clean up and mix a single signal live before pushing it into the computer or P.A. system at a live show.
For instance, the Avalon VT-737sp features not only one of the best compressors but also one of the best mic preamps available.
Specific FAQs
There are a lot of very common and specific questions about using a compressor live or in the studio. It's likely that most of you reading this might have one or a few of these questions yourself. Let's smash through them real fast.
How do I connect a compressor to the rest of my gear?
If you have a standalone preamplifier, then you'll output your signal from the preamp to the compressor with a TRS cable and then on to an equalizer, converter, or interface.
If your using a recording interface that features a preamp that feeds straight to the converters, then you'll want to check and see if your interface has an insert. This will allow you to insert the compressor (using a TRS cable) between the preamp and converters.
While not all interfaces have inserts (a cheap audio interface won't for sure), you can usually route directly from an output into a compressor and then back into the next line-in input to get around this scenario.
Should I compress during a live recording take?
I typically do, however lots of people tell you not to as well. The reason not to is that once you apply compression before the signal hits the computer, you can't undo it. The reason to go ahead is that you can dial in better gain staging, especially if you don't have a lot of headroom.
What I do is apply a light amount of compression, especially on vocals, to make sure there won't be any surprise clipping and distortion that ruins an otherwise perfect take. I then will apply more compression later.
Why Is a Hardware Compressor Better than a Software Plugin?
Is it? At this point, technology is advanced enough that both do their job perfectly. The problem with relying only on software plugins is that you can't apply compression to your signal before it's already passed the converters, which means you can't safeguard against clipping. Otherwise, for mixing they do just fine (albeit it's less fun than mixing through hardware).
The benefit is that one license of a plugin supplies you with as many as you need. You can compress as many tracks at once with several instances of the same plugin. With hardware, you need a separate compressor for every channel, which can get expensive.
I don't care who you are though, I suggest having at least one hardware compressor for vocals for the reasons I mentioned above regarding clipping. Then you have it too later if you want to get into mastering and summing on the mix bus.
Can I get by without a compressor?
No.
You get the point... It's like trying to drive nail into a board without a hammer or nail gun... good luck with that!
The Best Vocal Compressor is Here...
Just now, we walked you through the fundamental functions of compressors and how to use them to achieve the sound you're looking for. You understand at this point that having a compressor is not an option and that it really boils down to purchasing the best one you can afford.
We provided you with the best options in several budget ranges and then showed you the best of the best regardless of price.
At this point, you have all of the information you need to make a decision. Don't overthink it! By choosing any of the models discussed here you can be sure that you'll be picking up one of the best vocal compressors available.