
Mastering a track is the very last step to polishing a song before you release it to the public. But despite the misconceptions, you don't just master a single track. You polish off the entire album in the context of itself as a whole.
Yes, you want each individual song to sound great alone, which is the main task involved in mastering, but it also involves taking each separate track of an album and making them sound like a unified whole. Otherwise your album would sound like a compilation of random songs by the same artist.
The key thing this tells us is that this process occurs apart from mixing. It's an entirely different step. That's why you hear studio engineers and musicians suggest that you should "fix it in the mix," and then you'll hear mixing engineers say "eh, let them fix it in mastering." Each occurs separately in time.
Let's get right to it. We'll talk about the goals of mastering songs, the main ideas to keep in mind as we go about doing it, and finally how to master music like the professionals do it.
Mastering Tracks vs. Mixing Them: The Difference
First and foremost we need to establish the difference between mixing and mastering. The short version of the story is that mixing involves taking all of the individual tracks of a song, which includes vocals and various instruments all on separate tracks, and balancing them so they come together as one cohesive song.
This balancing involves volume adjustments, panning, equalization, compression, adding reverb and delay, and much more. Think of it like gathering ingredients and then cooking an amazing dish. Each dish is a different mixed song for the album.
Mastering is like taking the entrée and side dishes (the songs) and arranging them on the plate so not only does each item look amazing itself, but they look delicious together as a whole on a single plate (the album).
But with mastering we're no longer dealing with the nitty gritty of each song. We're giving the mix, which should have no glaring problems, an additional look-over, balancing certain frequency ranges, adding a bit more compression if needed, etc.
Then we do it again so the tonal balance of each song is similar to one another and sound like they belong on the same album. We want similar bass volumes, we want the vocals to all play at around the same volume, etc. So the question becomes how we actually do it.
Mastering a Track - Step 1) Pre-Mastering Steps
The assumption all mastering engineers make is that they'll at least be given stems of a song to work with if not the full, mixed project with all of the files on a hard drive. If you produced your own song then we can assume you have access to these, too.
"Fix it in the mix" and "Fix it in mastering" is a horrible idea. Always fix problems in the stage of the production process in which they arise. That's a key to pre-mastering, which are the final steps to apply after a mix is done.
Don't try to maximize volume
You can normalize, which means the loudest amplitude peak hits 0 dB but not over it (preferably never go higher than -3 dB). You don't want any audio clipping in your mix.
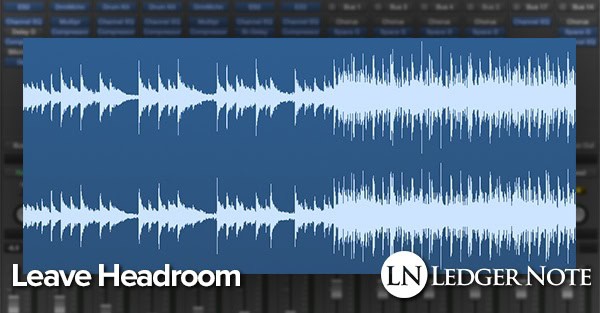
You can only hope the recording engineer did proper gain staging, but you can assure that you leave headroom. Export your stems without limiters and without distortion!
Record, mix, & master at the highest resolutions
Yes, commercial releases go out at a 16-bit resolution but you should work in a 24-bit resolution with at least a 48 kHz sample rate, if not 96 kHz. You can always down-sample with dithering but you can't ever add quality back. So start at the highest quality so you can make the best decisions.
Go easy on the mix bus compression.
If you're going to use mix bus compression, do it from the start of the mix. Don't add it at the end. Regardless, go very easy on the gain reduction. You want to leave some dynamics for the mastering engineer to work with. It's their job to do, not yours as the mixer.
Export stems or pass on the entire project file
By providing anything other than a mixed-down stereo file, you open up an entire world of possibilities during mastering. If you only provide a stereo mix, then they'll have to dig into the mix with tools like multiband compression, which is makes the task a lot harder and the result less polished.
Even if you're mastering your own music, these are steps you should follow, but especially if you'll be employing an outside studio. Making sure you get the best results means thinking about mastering during mixing.
How to Master a Track - Step 2) Fix the Problems First
Now you're ready to actually start the real process. The first thing you want to do is identify problems in the mix and begin to fix them. Nobody is perfect and when you're mixing you can get so caught up in the whole that you ignore tiny details, or you start to lose perspective after a while.
Your job is to be the final set of ears that catches these small issues and makes sure they don't sneak through to the final master. You're producing those, so be on your toes. Here's some things to look out for.
Remove Any Surviving Noise
This should be done in mixing with gain automation, a noise gate, and EQ roll offs, but sometimes a single track gets missed among the 30 or so.

Listen critically at the start and ends of the songs and during any quiet moments within the music for any hiss, noise, rumblings, stray vocals, mic bleeding, etc. Your tools for getting rid of these are the same as available to the mixer.
EQ Out Low-End Rumbling
I'm mentioning this separately even though it's a type of noise. Most of your noise problems are in the lowest end of the frequency spectrum. Isolate the part of the song and the exact stems that the noise is in and use an equalizer to roll off the low-end. Avoid using a low shelf because you want a wide Q to keep it smooth and musical.
Fix Harshness in the High Frequencies
Pay special attention to instruments like vocals, cymbals, hi-hats, chimes, guitar, keyboard, and synthesizer. These can all create momentary piercing volumes that must be caught. I'm sure we've all heard a professional release with an instrument that pierces our ears and makes certain songs unlistenable. You have to catch those.
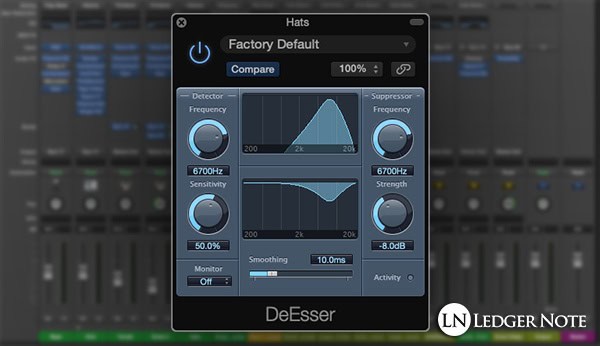
The best method to dealing with this is using a de-esser. It's like a compressor that only acts on a certain frequency band that you can dial in. You can use a parametric EQ to find these sharp squeaks and then move to a de-esser to remove them. It will reduce those frequencies only when they get too loud.
Listen for Distortion & Clipping
If you hear any unintentional distortion or clipping, you have only one option, which is to go back into the project files provided and fix it in the mix. If the distortion happen is the recording stage then there's nothing you can do about it. It's annoying but you'll have to tweak the mix volumes and bounce the stems again. Listen for over-compression while you do this so you can fix that before bouncing the stems.
The four sections above are the main tasks you'll perform in this first stage of mastering. Don't get lost in anything else other than focusing on identifying and fixing these kinds of problems. Stay in the analytical state of mind during this stage.
If you find the song is chock full of various problems, you can either tell the mixer to fix them all and re-export everything for you, or you'll have to suck it up and fix it yourself. That's probably quicker but it's definitely aggravating to do someone else's job for them. But if you don't, you'll get the blame.
How to Master Music - Step 3) Improve the Whole
You now have a song in front of you that is free from errors with pretty solid mix. Now you want to sit back and get into your creative state of mind as you listen to the full song. As you do this, take notes about things that stand out to you in general. These are the items you'll attack next.
Mastering Philosophies to Keep in Mind
Before you do anything you need to remember the core philosophy in mixing and mastering: Less is more. It's always tempting to make your work super obvious, but subtlety is better. Whatever changes you make shouldn't be obvious or extremely noticeable.
The rule of thumb I follow is to do whatever you're doing up until the point you're satisfied with it, and then back off 3 dB. Depending on what it is, maybe you'll only back off 1 dB or 2 dB, but you get the point. Always dial it back just a notch.
Once you actually get started, you want to be asking yourself two questions:
- What is the song or each individual track missing or lacking that could be improved?
- What already exists but could be enhanced to create a better listening experience?
That's it. Those two questions will guide you through the entire process in this second step. Whereas step one was about fixing glaring problems, this one is about improving the whole and enhancing the individual tracks. I'd go in this general order.
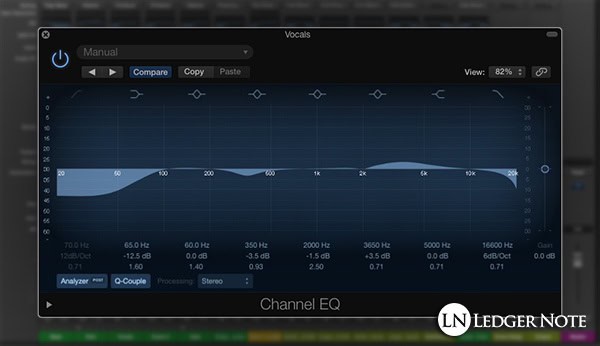
Equalization & Emulation for Tonal Enhancement
Look for instrument stems and the song as a whole where there needs to be more clarity. Maybe you want to add some more "air" to the vocals so you add a high shelf EQ. Perhaps the rhythm guitar could use more warmth and fullness in the mid range, so you whip out a valve emulator. Maybe there's too much accumulated muddiness and boominess.
A huge tip I can give you hear is to turn off your subwoofer. I don't mean to bypass it. Mute it so that the bass and sub-bass are nearly non-existent. This will let you focus on the mids and high frequencies with more clarity.
Balancing the Bass & Kick Drum
Now you're going to do the exact same process but with the kick drum and the bass track. The two core problems are always that there's either too much or too little sub-bass. You'll have a better speaker monitoring system than anyone else, so this is up to you to fix.
The other problem is that there's often not enough clarity between the kick and bass. This should already be done but one thing you can do is add sidechain compression to duck the bass out of the way of the kick. You might reshape the attack of the kick with a compressor, or tweak the EQ of both stems. Whatever it takes is what you have to do.
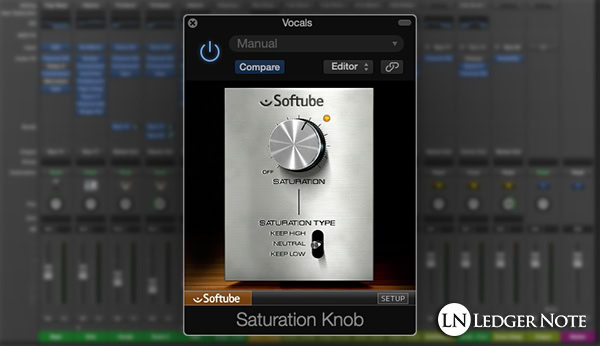
Saturation & Exciter to Liven Up Digital Sterility
The problem today is that we can record and mix with crystal clear quality. Most tracks are produced completely digitally too, so everything is so "see through" that it can start to sound sterile and dead, even though it's perfect. We can bring back a touch of the old school using two tools.
Tape saturation or transistor saturation as well as an exciter can provide two characteristics. If you use them on individual stems you can add some pleasing distortion that's made up of complex harmonics. This is very pleasing to the ear and brain, especially if you keep it subtle. This is something we lost when we stopped recording to tape reels.
If you apply a slight amount to the song as a whole you can help glue the tracks together. "Glue" means, to mixers and masterers, that separate tracks begin to meld together into one purposeful whole as they start to react together to effects rather than separately. More on that up next.
Compression to Add Some Glue
The first thing you want to do is make sure each individual track is compressed enough. Then you want to visit bus compression and make sure each grouping of tracks is glued together, like the drum bus, for instance. And finally you'll add some compression to the master bus for the song as a whole.
This is where "less is more" is extremely important. When we're talking about compression for glue, we're talking about the slightest amount. No more than a few decibels of gain reduction at a high threshold and low ratio, in my opinion. More than that and you risk getting weird pumping sensations.
Widen the Stereo Field If Needed
This one is tricky. You can return to the mix and increase the panning but you don't want to move too far away from the mixer's vision. Like, don't change a normal mix into an LCR mix, for instance. But in cases where they've faked stereo width using delays, you can increase that if you want.
There's also stereo widening plugins that can be applied to certain tracks, or you can use the chorus trick for bass to make it sound larger than life in stereo rather than a boring mono bass. The fundamental frequencies will still be mono, that's important.
Reverb for More Glue & Star Power
Finally, and this one is really risky, is to add reverb to the stems or song as a whole. If you do this, it needs to be very subtle. Less is more and definitely dial it back from what you think sounds good. This can add a little glue and make take a mix to the next level.
Play it safe and do this on a bus where you can EQ the reverb, duck it, whatever. It has to be perfect if you pursue this. Learn more in our Mixing with Reverb article about how this should be done.
Mastering Songs - Step 4) Compress the Whole
Now we're at the meat and potatoes of mastering. This is what most people think of when they think about how to master audio. They tend to think of compression and balancing levels between tracks, but we're talking right now about the individual song, but as a whole.
Multiband Compression
The first thing you want to do is deal with the stems, if you have access to them. In that case, if any grouping needs extra compression you can do it in isolation on the stem. But if you only have a stereo track you'll have to bust out a multiband compressor.
Multiband compression can be thought of as a parametric equalizer mixed with a standard compressor. It really more like a de-esser, in that it lets you target specific frequency bands and compress those alone. This lets you dig into a complete stereo mix and still reshape and balance the volumes of specific frequency areas of a song.
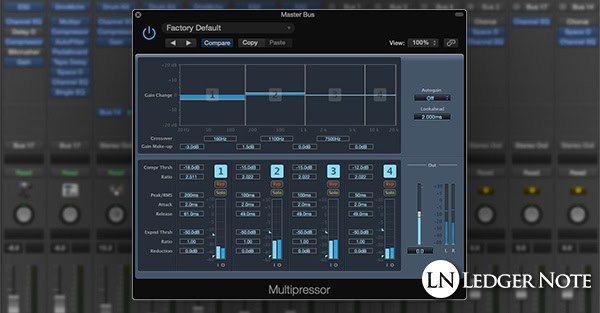
The example everyone gives is for a kick drum that's too loud. You can isolate the specific range for the fundamental frequencies of the kick drum and compress them when they fire off. Yes, you could EQ it but then you lose the advantage of the "momentary action" only when the kick drum triggers.
This is pretty tricky and if you can work with stems, then that's far better. If not, start off with as fast of an attack as you can and a very slow release. Even better if your plugin has an auto release option. Use a very low ratio of maybe 2:1 and test out moving up to a 5:1 at the most extreme end. Don't go for more gain reduction than 3 dB, if that.
Standard Compression
The same settings should be used when you apply one compressor to the master bus. That means the compressor is acting on the whole song and not individual tracks. Less is more and dial it back a notch!
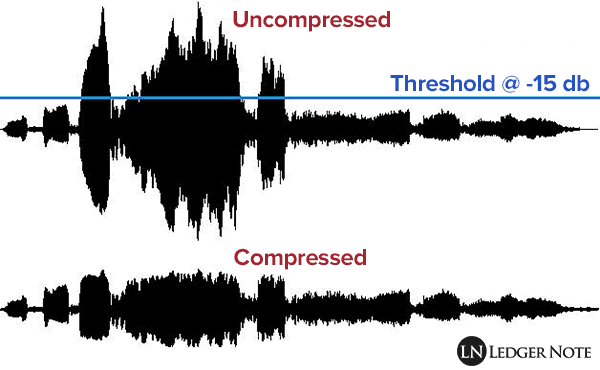
Your entire goal here is to reduce the dynamic range a bit so you can squeeze out more average volume when you normalize the track. There's a battle waging on called the Loudness Wars where people compete to have the loudest song on the radio or the loudest commercial on TV in order to grab your attention. It's annoying and we all hate it but we have to keep doing it (for the paycheck).
That doesn't mean you should slap a limiter on the master bus and crank up the gain. You don't want any clipping or distortion so you'll definitely use a limiter but you'll rarely bump into it. That's because the compression you're using reduces the amplitude of the highest crests of the wave forms.

Again, use a very fast attack (1 millisecond) and a slow release (1 full second) with around a 2:1 ratio and shoot for maybe 3 dB of gain reduction. More than that will have weird side effects. This will let you add 3 dB of make up gain. You can then run a second compressor in series if you want or bump into the limiter occasionally as long as it doesn't cause noticeable distortion.
Mastering a Track - Step 5) Soft Clipping & Limiting
I want to keep this short. You now have your song polished and compressed. Now your goal is to pump up the volume so you're competing with other professionals in the Loudness Wars. I know it's hard to believe but you're going to purposefully use digital clipping and do so without distortion.
Soft Clipping
Hard clipping means you're cutting the tips off of the wave forms entirely, leaving a flat plateau in it's place that sounds like a clicking noise. That's bad, but there's good clipping which is called soft clipping that can sound pleasing. It reduces the gain but does so while adding pleasing harmonics. Yes, this is distortion but not the bad type.
To achieve this, you'll want to use a plugin designed for it, like the T-RackS Classic Clipper. It's provides the difference between soft clipping and hard limiting. You can't slam it, though, or you still end up with distortion. This will just net you a couple extra decibels of volume.
Hard Limiting
Believe it or not, you're still not competing against the average volume of commercial releases. To get the final amounts of volume you need, you'll sadly need to hit a limiter. A limiter makes sure you absolutely do not run into hard clipping, which produces digital pops and clicks. It flat out will chop off the tips of the wave form to make that impossible.
Using a brick-wall limiter like this means you're destroying some of the work you already did, which is absurd but how it goes. Make sure this is the final step you do, and only shoot for another 2 dB of gain reduction.

The goal here is to make sure you're affecting as little of the mix as possible. You're only chopping off the loudest parts of the song and since it's done at such a slight amount it shouldn't be noticeable. If you notice it then you need to back off.
There's zero harm in releasing an album that's 2 dB less loud than your competitor if it means it's free of distortion. Let the customer touch their volume knob since they're going to anyways. The Loudness Wars are stupid. Engage in it but not at the expense of your masters.
Conclusion - Reference Your Master & Form the Album
As we say goodbye, let me tell you the next steps. You'll want to go ahead and master the rest of the songs for your album individually. Then you'll want to bounce all of them and start referencing them.
Referencing means two things. You'll want to listen to them on various sets of speakers, like ear buds, average headphones, mixing headphones, car speakers, computer speakers, with and without a subwoofer, etc. You want to emulate all the ways normal people will listen to your songs and make sure your masters translate well across all of them.
Second, you want to use reference tracks to compare to other professional music and make sure you're in the same ballpark. Your bass levels and vocal volumes should be similar, for instance. You want to meet the expectations of the listener, and that means sounding like everyone else.
Finally, once all of the individual tracks are done, you want to lay them all out on a multitrack and make their volumes match each other. It's simple and easy to do, but make sure you put another limiter on the master bus and be careful to barely hit it.
The last thing you'll do is add all of the digital meta data like u0022Artist Name,u0022 u0022Album Name,u0022 u0022Track Number,u0022 u0022Year of Release,u0022 etc. This way when you send it out to Apple Music, Spotify, and the others, all of that info will be there. Embed the album artwork too. And that's the long-winded answer to how to master a song.
Jared H.
 Jared has surpassed his 20th year in the music industry. He acts as owner, editor, lead author, and web designer of LedgerNote, as well as co-author on all articles. He has released 4 independent albums and merchandise to global sales. He has also mixed, mastered, & recorded for countless independent artists. Learn more about Jared & The LN Team here.