
Nothing matters more than vocals. You can get away with shoddy drums, guitar, and any other backing instrument. But vocals get all the attention, so you can't really compromise.
This is especially the case if you're recording vocals for music, a podcast, audiobook narration, or voice acting. Anywhere where your voice will be the center of focus, you have to produce a flawless recording.
Let me explain the enemies of a clear recording and why you need some type of enclosed recording environment. Then I'll show you the six options you have for building a booth in your own home.
And finally I'll point you to some articles here on LedgerNote that will help you with post-processing and mixing that can make all the difference. Mixing your tracks is as important as recording them cleanly.
Do I Really Need a Vocal Booth?
Yes, you really do need one. The enemy of clear recordings is your acoustic environment, which is to say the room that you're recording in.
The sounds emanate from your mouth and go straight into the microphone, but they also bounce all over the walls and continue entering the mic. This is a type of reverb that "smears" your recordings.
The sounds also reflect off the walls and back into each other where their waveforms will experience constructive interference and destructive interference.
This interference means they're combining their energy in various frequency ranges, either building up or canceling each other out. Most of the time indoors in small rooms that means you get a muddy, boomy recording.
I'm going to introduce you to six creative methods for creating your do-it-yourself vocal booth, ordered from the least expensive options that require the lowest effort. You'll find your results will improve as you move down the list to the more permanent solutions. Cheap recording booths come with compromises.
Your entire goal is to stop that wave interference, stop the reverb, and stop getting muddy, smeared out recordings. Your results will get better as you commit to a building a better vocal booth, and I'll explain why as we go. By the end you'll understand how professional studio vocal booths work too.
DIY Vocal Booth #1: The Clothes Closet
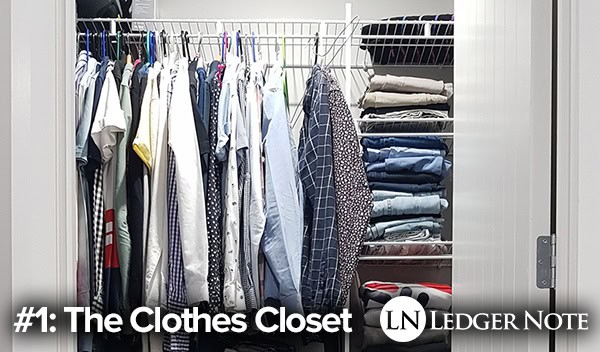
- Strength: Dirt cheap and you've already got it set up.
- Weakness: The ceilings, floor, and door in such a small room.
Your first option is your closet where you hang your clothes. It needs to feature clothes hanging on at least two opposite sides of the tiny room to gain the full benefit. The more clothes you have, the better. And if you have a rack of shoes or anything similar, that's even better.
First and foremost, the clothes themselves will act like a type of acoustic treatment called absorption panels. These suck up the energy from the sound waves, converting it to energy and stopping it from bouncing back into your mic.
The only downside is your clothes aren't thick and dense enough to stop bass waves from bouncing around. You'll get rid of most of the reverb that causes the "smeared out" sound in your recordings, but they'll still sound muddy and boomy. I'll show you how to fix that in the additional tips at the bottom.
What you want to do is have a rack of hanging clothes in front of you and a rack behind you. This way, any voice sounds that go past the mic will be largely absorbed passing through your clothes once, hitting the wall, and passing back through. Then the remaining sound waves will do the same in the clothes behind you for a quadruple absorption attack.
Any racks of shoes or other storage you have at the level of your head will help diffuse and scatter (break up) the wave forms, reducing their energy and thus volume so they won't be as loud in your recordings. Stuff like book shelves help with this tremendously.
If your closet is carpeted on the floor that's even better. If not, place a thick, shaggy rug in there if you can. This will help stop reflections bouncing off the floor and ceiling in a big loop. Leaving the closet door open is a good idea, since it will be to your side and can let sound escape.
But to keep your expectations realistic, let me tell you that you won't be amazed at the results. It'll be better than recording in an open room, but not by much. You'll still have amateurish recordings on hand, unfortunately.
DIY Recording Booth #2: The Pillow Fort
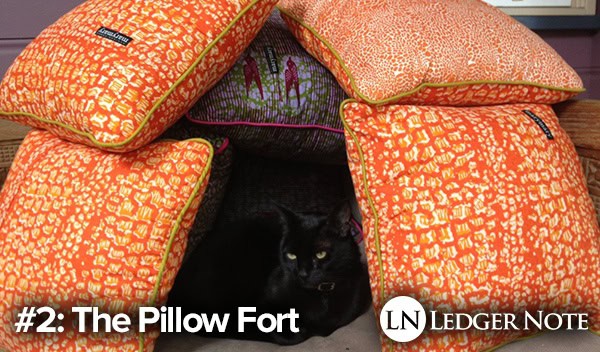
- Strength: You're creating a tiny room just for your microphone.
- Weakness: You'll still have bass waves coming through.
The idea here is to take some decorative pillows off of your couch or from your bed and to create a small fort on your desk that your mic can sit in. It's like shrinking the closet method from above down to the size of your mic and having clothes on five of the surfaces.
The problem here is that the bass waves, just like with your clothes, can still pass through the pillows. The cotton, polyfill material, or memory foam is not dense enough to absorb the long wavelengths of bass sounds.
But this is definitely better than recording vocals in a closet and easier to set up since you'll do it at your desk. And if you don't have a small desktop mic stand you can simply lay the microphone on its side on the bottom pillow. It will function just the same as being upright.
The best part is you don't need long mic cables and headphone cables to reach from your computer to your closet. You'll already be at your desk. And this method is super quick to set up and break down.
DIY Sound Booth #3: The Reflection Filter
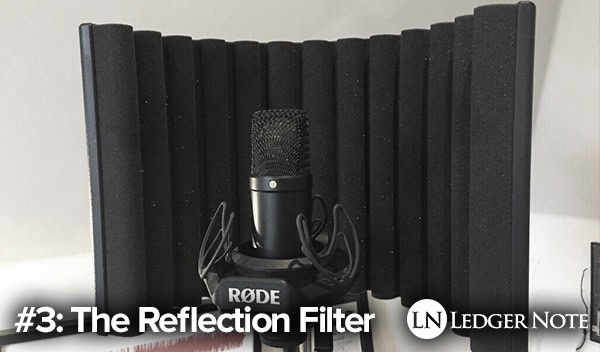
- Strength: Relatively inexpensive, lasts forever, and can stop bass.
- Weakness: You'll need a mic stand with a wide base or tripod legs.
Let me say that for most people reading this article, this is the method you should go with. Professionals in the industry created the microphone reflection filter as a portable vocal booth. It's not perfect, but it's as close as you can get to the real thing with minimal effort.
These shields are built with real acoustic treatment lining the inside, which curves around your microphone to stop reflections from bouncing back behind you, which means they can't hit the wall behind you and come back into the mic.
The best part is they're able to stop most of the bass waves from getting through, which will do wonders for you in the "muddy" department. The less you have to fix your vocals later during post-processing, the better your end results will be.
This will get you there and provide more than acceptable results, assuming you have a quality microphone and preamp (or a good audio interface). Many professional studios use a reflection filter in conjunction with more involved methods, so they definitely improve your recording quality. Here's the reflection filter I use and suggest.
DIY Isolation Booth #4: Acoustic Blankets & Curtains
- Strength: Can help turn your whole room into a vocal booth.
- Weakness: You will still struggle with bass in your recordings.
I wasn't sure if this should be #3 or #4. The benefit is that you may be recording groups of people and can't spend the time creating a bunch of tiny, individual booths for each mic. With acoustic blankets and curtains, you can hang them on your wall permanently.
You've seen these in movie theaters and in auditoriums. Look at the walls and you'll likely see areas with thick curtains hanging for seemingly no reason. This is the reason. They'll stop most high frequency and mid frequency sound waves from bouncing around.
If you're in a big enough room with bookshelves, wall decorations, a bed, and other variously shaped objects, that will help to diffuse and scatter the bass waves but you'll still struggle some, but not as much as you would have without these curtains.
If you think this is an appealing method, then I'd advise you to get serious and skip down to the next method, which is how you really turn an entire room into a vocal booth. It's how the professionals do it. Otherwise, if you do this, I'd advise not hanging the blankets on your walls but creating a tent out of them that you can walk into.
DIY Vocal Booth #5: Acoustic Treatment
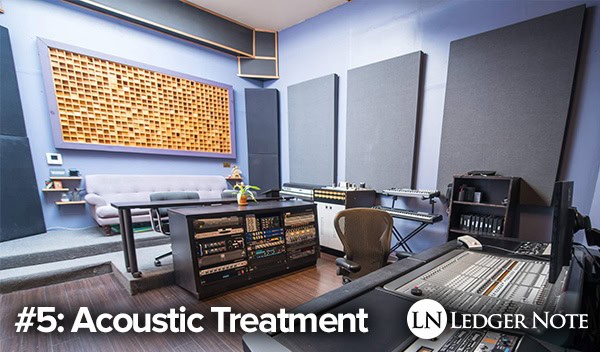
- Strength: You can get perfect audio quality every time.
- Weakness: This can get expensive and require a lot of effort.
This is how real recording studios (like Brewery Recording Studio pictured above) stop sounds from reflecting around inside a room. Acoustic treatment is just like the curtains, pillows, and clothing except they're thick and dense enough to absorb bass sound waves too.
I've personally built my own acoustic panels, and it was expensive and a pain in the butt. If you can afford it you can just buy them outright (I suggest GIK Acoustics), but since they're big and heavy you're going to hate paying the shipping costs.
These come in various shapes and sizes, including absorption panels, bass traps, ceiling clouds, etc. This is a huge rabbit hole that you can get obsessed with, and it's super fun. This is the main method real recording studios use, in addition to soundproofing their rooms when they build them.
If you want to learn more about this, one of the first articles we ever published was a monster guide on acoustic treatment. If you read that, you'll know 90% of all there is to know about it and can decide if it's the right method for you to apply.
Homemade Sound Booth #6: The Legitimate Booth
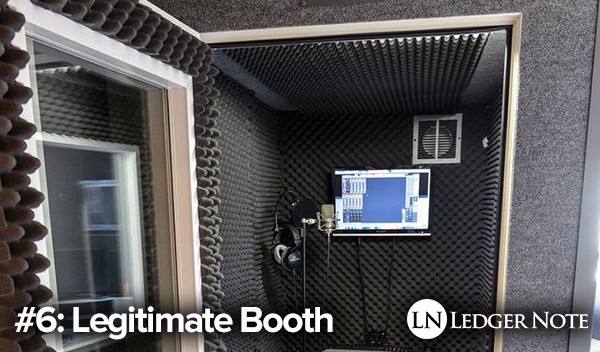
- Strength: You can get perfect audio quality in each recording.
- Weakness: This requires the most effort, time, and money.
I actually did this once and pumped out several albums using it. The results were so good that the word got out and local bands started paying me to come over and use my gear and this booth. That's because they didn't want to go through the trouble of building one themselves, and you probably won't either.
Building a real vocal booth can be done in your home and it can be a non-permanent fixture. What it requires is equal to building a real room but even more involved since you need a floating floor and ceiling, thick walls with insulation and "sheetblock" for soundproofing, and then acoustic treatment on the inside walls too.
I'm not going to say much more about it. If this is for you you'd already be reading other articles about construction. My advice after having done both this and built acoustic treatment, go for acoustic treatment. That way you can record anywhere in a room and even accommodate full bands. It's cooler and less of a pain in the butt.
Additional Tips to Clean Up Your Vocal Recordings
You read this article because you want top-notch vocal recordings. You should absolutely build a do it yourself vocal booth or at least buy a reflection filter, but there's more you can do. You obviously know how to record, and with a few vocal mixing techniques you can really boost your quality into the atmosphere.
Below are some articles we've published in the past chock full of information you can apply to help create better vocal recordings and to clean them up better after the fact:
- Recording Vocals at Home: Clean & Clear
- 14 Tips for Recording & Mixing Vocals - The Right Way...
- 13 More Vocal Recording Tips
- Taming Sibiliance & Plosives in Your Vocals
- The Best Mic Preamp for Every Budget
- The Best Cheap Microphones for Home Studio Recording
- The Best Audio Interfaces for Home & Studio Recording
The top four links will give you tons of tips and tricks for polishing your vocals after you've recorded. The last three include our product recommendations on the three most important items that contribute to vocal quality, which are the microphone preamplifier, the microphone itself, and the audio interface, in that specific order.
That's How to Build a Vocal Booth!
There's nothing worse that buying a ton of studio gear, learning to connect it all to your computer, then figuring out how to use the DAW software only to find out that your recording quality sucks. As you've discovered, that's not the fault of your gear.
It's the fault of your room and a poor acoustic environment. It can be fixed by building a DIY vocal booth. How much effort you want to invest will effect your end result. You can go all the way, do too little, or opt for the middle ground and buy a reflection filter. The choice is yours!
Jared H.
 Jared has surpassed his 20th year in the music industry. He acts as owner, editor, lead author, and web designer of LedgerNote, as well as co-author on all articles. He has released 4 independent albums and merchandise to global sales. He has also mixed, mastered, & recorded for countless independent artists. Learn more about Jared & The LN Team here.