

The two most important aspects to "recording and mixing vocals" is implied in that phrase right there. There is the recording phase and then there is the mixing phase.
When recording, representing your voice in the most accurate and pristine way is about what not to do. It's a somewhat passive stage where as long as you nail your performance while dodging specific recording mistakes you'll be fine.
When mixing, polishing the final product is an active stage where you have to navigate the signal processing and effects plugins with knowledge and skill or you'll sabotage your results. While the previous is the artistic part, mixing is the technical part.
There's a lot of information out there on the internet. Lots of lists of tips and tricks that never really tell you anything. They either give you the blatantly obvious or the intricate and complex without enough information to make it actionable.
In this article, we're going to keep it short and sweet without wasting your time and we're going to make sure you have every vital piece of information you need to record your voice and then mix it down with the production skills of a mixing master.
We'll also link you to other resources we've written so you can explore pieces in more depth if you want. Let's get this party started! Soon you'll know how to record vocals like a pro.
We're going to discuss these tips in the order that you would encounter them as you record and process your vocals. That way, if you're not an absolute beginner, you can skip forward in the logical sequence and find what you need. If you want an in-depth look at how to mix vocals, we've got that for you too. Let's do it.
Recording and Mixing Vocals The Right Way
Before we get into these tips, let's assume that the vocalist is ready. They have warmed up, performed their practice exercises, and are comfortable.
They have their preferred beverages to keep their throats lubricated and they are well rested. We're not going to get into the psychology and physiology of singing itself, just with recording and mixing of the vocal takes.
In case you want to jump around, tips 1-8 are the recording tips, and tips 9-14 are the mixing tips.
1) Have the Right Gear
Not to insult any reader's intelligence, but if one person hears this here then it was worth it. A lot of people think you buy a microphone and plug it in and that's that. If only studio recording was so simple, right?
At bare minimum, you need:
- A high quality dynamic or condenser microphone
- A preamplifier possibly with phantom power capabilities
- A recording interface with decent analog-to-digital converters
- A digital audio workstation (DAW) software to capture the vocals.
Don't let yourself feel intimidated by that. You can typically find a very decent package deal these days that includes a condenser mic with a recording interface that has preamps and converters built in and even comes with a copy of a DAW.
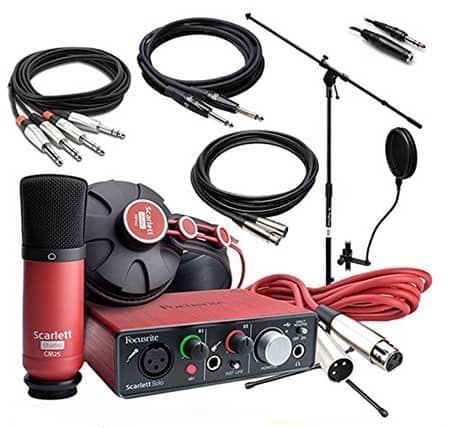
For instance, the starter pack above not only has a large diaphragm mic, a stand, pop filter, and all of the cables you need, but it also comes with studio headphones and a preamp and line-level input for instruments. Something like that gets you started without having to piece together and research all the various parts.
Now, the above starter kit is more like "entry level professional" or at worst, "high level consumer" which is still pretty good. It'll get you going without breaking the bank. If you follow the rest of these tips, it will produce great quality vocals for you.
If you want to explore how all of these pieces work individually, we have two fantastic write-ups for you to bookmark: How to Setup a Recording Studio and Recording Vocals at Home: Clean & Clear.
Okay, so you have what you need to record. Now you need to control what you record.
2) Isolate the Source
Having access to the right gear will take you a lot of the distance, but not all of the way. You'll at least need acoustic treatment or a contraption like pictured below:
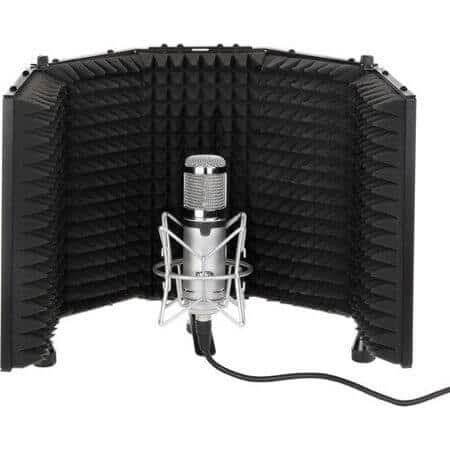
The idea is to turn an entire room into a vocal booth or create a portable system that helps isolate the raw source (your voice) from the reflections bouncing off of the walls. This is absolutely key to creating a clear recording of your voice.
Otherwise you'll get a result that sounds smeared and boxy due to the reflections, delays, and other acoustic anomalies that occur in an enclosed room that will feature weird peaks and dips in it's frequency spread.
Learn more about acoustic treatment and why you need it in our article entitled The Acoustic Treatment Guide for Panels & Foam.
Strangely, I also have to suggest that you isolate your voice from your breath. What I mean is that, when you breathe out as you sing or rap, you're pushing a lot of air that the microphone can record. The specific peculiarity you want to avoid is picking up plosives.
The key to avoiding issues with plosives is to record off-axis, meaning you should aim your voice just to the left or right of the microphone instead of directly at it. The second defense against this problem is a pop filter, like the one pictured above in the starter kit.
These pop filters do exactly what they say. They filter out pops in your breath as you sing by dissipating and spreading out the impact of the powerful blast of air. If you want a fancier pop filter, I prefer the following, because appearances do matter:

We've covered in-depth the nature and problem of plosives in our article called Taming Sibilance and Plosives.
Finally, the last thing you want is to have your instrumental leaking out of your headphones and into the microphone as you record. Earbuds can work sometimes, but I recommend you pick up a set of closed-back headphones that are meant for recording applications. My personal favorite are the Sennheiser HD280 Pro's, although any set will work.

The key is that the soft cushions seal off the sound so that it only reaches your ear and not the microphone. Also, the back is of solid construction, versus a perforated style that may be more preferable for mixing but horrid for recording.
So now you have the ability to record the highest quality version of your isolated voice. But just because you have the ability doesn't mean you know how.
3) Gain Staging
This is where a lot of people goof up. It's easy to start twisting knobs on the preamp and interface until it sounds right in the computer. It's also just as easy to screw up your gain staging. So the question is, "What is gain staging and how to do I do it right?"
Gain is the ratio of the output of a signal, in this case your recorded voice, to the input of the signal.
It's kind of like a volume knob, except there's a maximum and a minimum range before your quality takes a nose dive and this range exists at every stage of the recording from your mic to the preamp to the converters. You need to get it right at every stage to secure a professional quality recording.
Fortunately, you can do it without fully understanding it.
If you want to understand gain staging in depth, read our Headroom in Audio Recording article.
The basic concept has to do with fully using every "bit" available to you in the computer without pushing it too far. It's just like pixels on your TV or computer screen.

Recording quietly means you have to turn up the volume later on. This is like saving an image very small and then stretching it out on a 62" television. It's going to look extremely blurry. But if you save the image (record at the right volume) initially, you won't have to stretch it (turn it up) later.
Since you're working with a very simple signal chain, setting up the gain staging is quite simple. In your software that you're using to record, whether that's Garage Band or Pro Tools, you need to monitor the level of the signal you're sending in.
- First and foremost, put the master gain on the interface at 0dB. You don't want to add or subtract from there.
- If you're singing at a comfortable volume and the signal is too loud (hitting the red and clipping in your software) or not loud enough, you want to adjust only the gain on the preamp channel you're using.
- Adjust the gain until your average volume is coming in around -18dB. You'll go over some and below some, but most of the time you're coming in right at -18dB. Don't shoot for 0dB in the computer, this means that you're pushing your hardware like the preamplifier about 18dB too hot. Shooting for -18dB digitally is shooting for 0dB analog. It's a long, confusing story.
Conceptually it looks like this:
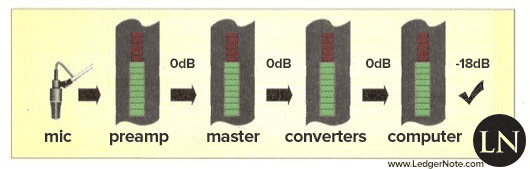
If you do this right, it means your preamplifier is operating at the optimal volume, your master channel is sitting at perfection, and your analog-to-digital converters are nailing the perfect level. In our case, we can do it all with one knob, the preamp's gain.
If you want to really dig into the concept of gain staging, check out our deep dive on the topic.
Now, my friend, you're recording the highest quality possible vocal ever. Now it's not about how you're recording, but what you're recording. Allow me to explain...
4) Always Record a Dry Vocal Signal
There's the temptation to deal with recordings like the old days when you were committing straight to tape and you had to get it right the first time. This means that you'd go ahead and record your reverbs and other vocal effects lives. There's absolutely zero reason to do this today in the digital world.
The only effect that has any business hitting your signal before the signal reaches your computer is compression. If you don't need to compress before hand, then don't.
Some singers are unruly though, move closer and further away from the mic as they perform or are just extremely dynamic naturally. You may need some compression to keep them from clipping or at worst a limiter. Something as light as a 2:1 ratio should help tremendously though.
Always record your vocals completely dry and add effects in the mixing stage. Always!
The reason you want to record a dry signal, which means no time-based effects like reverb, delays, and echoes, is to keep your options wide open when you begin to mix.

If you commit an effect to the track, you've just wiped out all options. You're stuck. If you apply compression, you're now compressing reverb and echoes too. You can't choose a different reverb. Never record wet. Dry only!
Remember, the entire reason you went through the trouble of isolating your signal is to get rid of flutter echoes, early reflections, and other acoustic problems. Don't add any in at this point.
5) Use Talkback & Headphone Effects
Your goal as a vocalist is to give the best performance possible. Your goal as a studio engineer is to make sure the vocalist has what he or she needs to give that best performance.
We said to always record a dry signal, but that doesn't mean you can't listen to a wet signal as you record.
The most comfortable place to sing is in the shower. People belt it out and let loose and feel great about it. The reason has to do with reverb. You're in a tiled or paneled shower in a small room with a tile or linoleum floor with a hard counter surface and a big mirror, etc.
Everything is hard and flat surfaces bouncing your voice all over the place. What you end up with is a big, lush reverb that masks the precise details of your voice.
You may not sound awesome to your neighbor, but you can't hear the tiny details that make you self-conscious so you feel like you're giving a Grammy-worthy performance.
Help your vocalist feel this good and get their mind out of their way by feeding back their voice into their studio headphones with some reverb. It makes a world of difference to the singer's mindset in a good way.
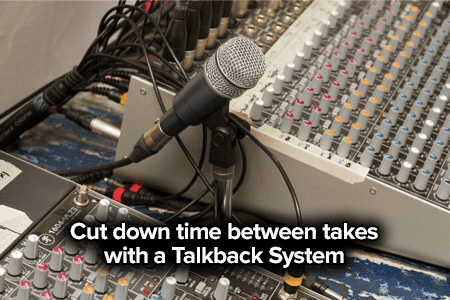
The second thing you want to set up is a talkback system. Most DAWs make this fairly easy to do. All you need is a good cheap microphone to set on your desk to speak to the vocalist with.
It'll be on mute until you press and hold a certain keyboard shortcut, then you can talk directly to the vocalist without them having to come into the mix room or even take off their headphones.
It's kind of like a baby monitor. There are also hardware solutions but at this point that's just for fun when you want another toy.
This system keeps the singer's environment stable and keeps their head in the game. Without this, you could tack on several minutes between each take. With a talkback system set up, you can drop that to as little as 3 seconds. This is the key to working up to a perfect vocal performance.
Regardless if you use a hardware or software solution to trigger the ability to talkback to the vocalist, you're going to want a desktop mic stand. What you want is a sturdy yet small base that's heavy enough to not tip over.
You won't be moving the mic around so it's not that much concern. It's also a great option to have around in case you get one of those vocalists who's more comfortable singing while sitting down.

This isn't something you need to break the bank over. The one above is less than ten bucks and is a top seller on Amazon.
The sweet thing is it comes with an adjustable mic clip too, so you can change the height and the tilt of the mic. I recommend using a cheap dynamic microphone for this as well. Again, no need to break the bank. I'd snag a used Shure SM57 or something in that range.
6) Record More Main Takes Than You Need
As you're going through the process of recording you aren't going to have time to analyze every take.
The best approach to handling this situation is to save all of the previous takes when the pressure is on, save the "that's the one!" take, and then record a couple more run-throughs once the pressure is off because the vocalist feels like they have a good enough performance already in the bag.
Always follow the philosophy of Hadden, the character in the book/movie Contact, when recording:
"Why build one when you can have two at twice the price?"
If your first version is bad or is destroyed, you have a 2nd fallback option and it only costed you time. In the end, if you need it, it's saving you time.
Never put all of your eggs in one basket. It's like Wu-Tang Financial says... "Diversify your bonds." We'll talk about what to do with these various extra takes in a second...
7) Record Harmonies and Accent Phrases
Even if you think you won't use them, record harmonies and accent phrases. You want to create options for the mix process. The performer might tell you they want a real intimate performance with no doubles or harmony lines.
Tell them "okay, agreed, but let's play it safe and record them anyways." You never know when the song might get rearranged and have a huge build up at the end where these come in handy, and other similar scenarios.

The point is, you never know and you don't want a separate session on a separate day because voices change. The rapper Rick Ross is horrible about this and it stands out like a sore thumb.
Record everything in one session including extras so when the unforeseen happens later, there's nothing to worry about. And you'll have the ability to create remixes, TV spots, radio clips, etc.
Another rap example is Kanye West. He never uses doubles or accent phrases, except when he does... and that option wouldn't have been available if some studio engineer didn't save everything or request it. Having several options lets you create thick choruses with panning and really forceful end-of-line phrases.
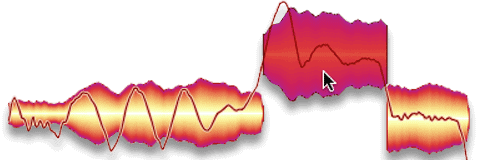
8) Create the Perfect Composite Take
We're going to talk about this from the view of the main takes, but do it for the harmonies and accents as well if you're going to use them. Otherwise save them for later just in case. This is the reason for saving all of those takes... creating a composite take:
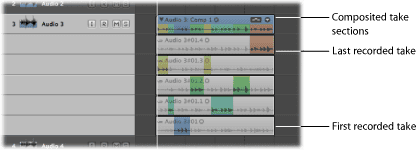
The above example comes straight from the Logic Pro documentation. All of those extra versions of the main take that you captured now allow you to pick and choose specific phrases from all of them to create the perfect performance.
Your best take might have been great for 80%, but there are a few weak parts that you know the performer could have sung better. Fortunately they did on other takes and you saved them.
Creating a composite take is just like being at the grocery store and trying to buy a dozen eggs. You open the container and see one is busted, so you switch it for an egg from another container, thus creating the perfect set of a dozen eggs.
Most DAWs actually come with the ability for you to stack takes behind one another and then expand that track on the multi-track to create a comp. Most will even do some nice cross fading for you so it all sounds smooth.
In the image above, you're choosing phrases and Logic Pro is color coding them per take so you can visualize where each piece is coming from in the composite take.
You can then bounce a "perfect version" if you want or just leave it as a composite if your computer can handle it once you start adding effects. And this is why you never hear a live performance that sounds as good as the studio recording. Because the studio version is, in every way, larger than life.
9) Automation & Noise Gates
You've made it! You're now ready to mix. You've captured and created the most perfect vocal take you'll ever get. But it still doesn't sound like your favorite record. No fear, that's what mixing is all about. It's time to polish and cut that diamond into a work of art.
The first thing you're going to want to do before you add any time-based spatial effects is clean up the dynamic aspect of your recordings. Dynamics refers to amplitude, which is referring to volume. You need to balance the levels of these takes.
What you'll notice is that, while the performance itself is masterfully completed, some portions are quieter or louder than others. This is where volume automation comes in handy.

This is what drawing volume automation lines looks like in pretty much every DAW. Back in the day, analog mix engineers would literally "ride the faders" up and down to do this. In the digital world, we can draw it in with our computer mouse instead of wasting tape on mess-ups.
Your goal here is to attempt to average out the varying volume across the whole take. The reason is that you want to send consistency to your effects busses. "But isn't this what compression is for?"
Sure... if you don't use advanced tricks like parallel compression, pre-compression reverbs, etc. Plus, if you don't do this before you send the channel to the compressor, you're going to completely squash some sections while barely touching others. Don't be lazy!
Now, at this point you can also decrease the volume of breaths, create silence at the start and end of the take, etc. You can really get in there with a laser-thin scalpel if you want.
Or you can just fire up a noise gate and save a ton of time. You may have to go back even after the noise gate to specific problem breaths or noises but in general this is going to take care of the problems for you.
A noise gate is a type of compressor. It operates on this logic:
"If the volume of the signal dips below X decibels, then decrease that volume by X decibels (or silence it altogether)."
You'll have to find the right threshold so you aren't cutting off the trailing ends of your singer's vocals and set your release to the right value. You'll want a fast attack here.
Explaining how a compressor works in full-depth is beyond the scope of this article, but of course we've already covered studio compressors here.
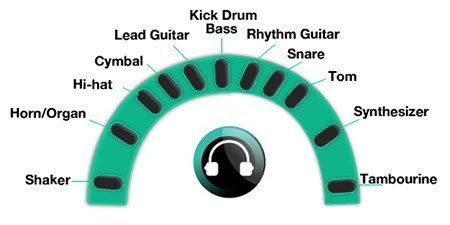
10) Designing the Soundscape with Panning
Now that you have the perfect take with all of the noise reduced and everything else playing back at consistent levels, you can go ahead and lay the ground work for your soundscape.
We aren't in the world on monophonic recording any more (although some radio stations are). Not only are we dealing in stereo recording and playback, but surround sound is becoming increasingly prevalent.
Even in stereo you have a wide area, even if abstract, to fill up with sound. Width is awesome as a listener, so get ready to start panning.
Always run your main vocal take straight up the middle with no panning.
Sure, you'll hear some early Beatles and Beach Boys where the mixers panned like mad men, but that's because the conventions hadn't been set yet and stereo was still new. Just like your bass guitar and kick drum, always leave your main vocals right up the center.
There's a hundred reasons for this that include off-axis listening, not over-taxing one speaker, etc. This is pretty much a law for any and every professional recording and mix. You can still check your mixing in mono to make sure you don't have any problems with equalization or phase cancellation, etc.
Generally long back-up phrases can be panned very wide, far left and far right. Explore the width between 45 degrees and 60 degrees (this is the max) and see what feels right.
You'll want to have back-ups a bit quieter than the lead. Never let anything get in the way of the listener being able to hear your lead vocal crystal clear.
For harmonies you'll typically want to keep them panned fairly close to the main vocal or you lose the harmonic aspect of it. Sometimes it's cool to create a little distance between them (not the extreme) though, so definitely experiment.
For accent phrases and rap ad-libs, play around as well. Extreme panning can sound great throughout the entire song, but you lose the ability to emphasize the chorus this way if you do it the entire time.
You're not locked into one scenario for the whole song. Definitely switch it up between versus and chorus to give your listener some ear candy.
Note: Go ahead and design the soundscape how you want it. For instance, you know you want to stack the harmony behind the lead but it becomes an unclear mess when you do. You'll take care of that in the next step with equalization.
The last point to mention is that you shouldn't go haywire with this and let your vocals eat up the entire stereo field. Save some room for the instrumentation. Plan ahead and have some kind of picture in mind for the final product.
11) Equalization (EQ)
This is where you create clarity. The problem is that this is the same person's voice, even if it's different notes in different octaves and no matter how far you pan them.
You'll have collision and you need to solve this by carving out pockets in the frequency spectrum for each piece of the vocal performance to dominate. We go in depth on how to EQ vocals if you want a deep dive.
Don't get me wrong here. There will be 95% overlap and should be. It's not a "this or that" scenario, but a "mainly this or mainly that" continuum. See the image below for an example of how instruments dominate but share frequency ranges.
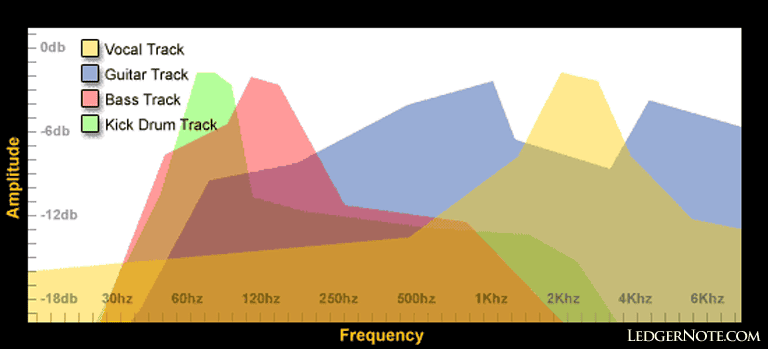
The law of equalizing your lead vocal is that you never compromise it for anything else. The most important aural aspect of every song with vocals is the lead vocal. Every time, no questions asked.
It's what the human ear locks on to and wants to hear. What this means is that you will use EQ to carve pockets for the main vocal take out of other instruments and vocal takes.
This doesn't mean that you won't perform some EQing on your main take because you definitely will. But you won't carve out giant chunks so that you can hear the guitar better. You'll carve out of the guitar so you can hear the main vocals better.
We talk a lot about these EQ techniques in our Audio Mixing for Dummies and Audio Mixing Tips articles if you're looking for more guidance. I'll cover what you need for vocals here without explaining how every little thing works. I'll have to assume you know how to use an equalizer, for instance.
Remember, you should never mix your vocals in solo mode.
At this stage you should be bringing the rest of your instruments into play in the mix. Go ahead and lay your drums out, bring up the bass, pan your guitars around... lay out your soundscape so you can hear how your vocals are interacting with everything else. We're going to create clarity for the vocals, then deal with the rest of the mix later.
Everything I say in this section is relative to the rest of your mix, and no mix is the same. There are no hard rules. Please adjust values to your own mix.
Roll-Off the bass frequencies
The one thing you can be sure of for most mixes, unless its a vocal/piano or vocal/guitar duet, is that you're going to be rolling off the lower frequencies.
Your vocals may not be noticeably reaching down into the bass and sub-bass regions of the frequency spectrum, but there is some volume down there in all of your vocal takes and all of your instrument tracks. And it all adds up to create mud.

You can use a high-pass filter (same as low shelf) if you want a strict cut off or you can use your parametric equalizer to create a gentle roll-off. It's up to you. I'd get used to hearing subtle changes with the parametric EQ if you aren't. A strict cut off threshold is often noticeable and too harsh.
This is a parametric EQ that shows the entire audible frequency spectrum for humans with the lowest at the left. See how the "composite" white line (the combination of all of your different EQ adjustments) is rolling off gently at the left bass end? That's a roll-off.
You'll find that you'll want to roll-off a bit more aggressively as starting around 125 Hz or so to eventual silence by 40-60 Hz. Play with these values but that's a good starting point. Depending on your bass and kick drum, you may push all of this higher.
Once you do this for all of your vocals and other instruments, you'll find that things are immediately much more clear in your mix, specifically for the kick drum and bass (tips for mixing those two are available here).
Trouble Frequencies to Adjust
The proper way to find trouble frequencies poking their ugly head up in your vocals is to take one node in your parametric EQ and create a thin but drastic boost of 10-15 dB and sweep it up and down the spectrum.
You'll hear strangeness in your full mix, and you can find your vocal's contribution to this problem in this method.
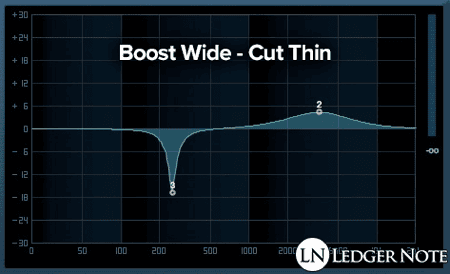
Once you find them you'll want to remove them, but never cut thin like you boosted. That was just hunting and pecking.
The actual method of reducing these frequencies should be small cuts of a 3-6 decibels with a bit of a wider Q curve. The rule is to boost wide and cut thin, but not scalpel thin or things will start to sound weird and in-human.
Here's a general guideline you can follow to find these problematic areas (notice the crossover):
- 100 Hz - 300 Hz: Too Little Loses Body, Too Much Here Removes Clarity
- 200 Hz - 500 Hz: Just Right Feels Warm, Too Much Sounds Boxy
- 250 Hz - 750 Hz: Too Much Sounds Muddy
- 600 Hz - 1.1 kHz: Too Much Can Sound Honky & Nasally
- 1 kHz - 3 kHz: Intelligibility Hides Here (The Sense of Understanding What's Being Said)
- 3 kHz - 6 kHz: Presence
- 5 kHz - 8 kHz: Sibilance
- 9 kHz - 15 kHz: Sparkle / Crystalline
- 10 kHz - 20 kHz: Air / Breathiness
Remember, depending on the vocal range and octaves the singer is working in, this will change. Especially with gender. That's why there are such wide ranges provided for you to hunt around in.
A great trick for keeping the lead vocal in front of the mix is to give it a small wide boost in the right Presence range and also in the Intelligibility range. Then give a thinner cut in those same regions on any competing instruments or the backup vocals depending on panning.
We could talk about this all day but nothing replaces the time you spend listening and playing with these frequencies. I mean, there's no way for me to explain what Honky or Boxy means until you've heard it. Just get in there with your best studio equalizers and do what sounds good.
Always start with the vocal itself in solo to craft a voice that sounds "good." Then go to the full mix and create a space for that "good" voice.
All Secondary Vocal Takes
In general, no matter if we're talking about full doubles, harmonies, accent phrases, etc... you can treat them more harshly. Cut them thinly where you boost wide on the main vocal. Get them out of the way, they are there to support the lead, not shine themselves.
Roll-off the low-end far more aggressively and higher on secondary vocals. You can also roll-off the high-end as well to so you aren't overfilling your mix. The trick is to reduce the overall presence of these backups in the mix but still give them priority in regards to the rest of the instrumentation.
One way to help you in this endeavor is to compress them aggressively. Speaking of compression...
12) Compression - Tightening Up Dynamics
You're real close to professional studio quality vocals, but something's missing. That's because the industry and listeners currently prefer very little dynamics in vocals (or music in general). What you're missing is compression.
We waited till now because when you boost and cut with the EQ, you're changing the volume of your recording slightly. Your goal is to control dynamics so you want to make all of your volume changes before you compress. You're going to bring back that consistency we talked about before feeding the signal to spatial effects.
There's going to be two or three steps to this process of how to compress vocals, completely dependent upon the genre of music you're working with, the singer's voice, and if you want to use parallel compression.
General Compression
First up, you'll always want to achieve the right level of compression first off. There's no way to guide you through this other than for me to tell you to find mixes you like in the genre you're mixing in to get a sense of how much you should squash the vocals. That's what compression does.
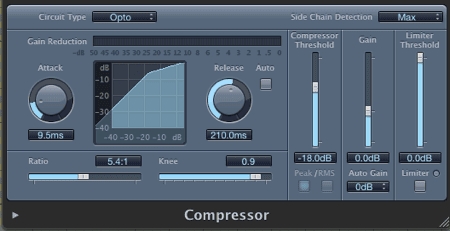
Compression sets a threshold and then any part of the vocal that goes over that threshold gets squashed by the ratio that you choose. The speed at which this squashing starts is called the attack, and you can tell it to stop squashing immediately or to keep on for a while using the release.
Those are your four settings. Some compressors let you change the "knee," but largely it all depends on the compression algorithm being used. Some plugins even have different algorithms for you to choose from, emulating old hardware compressors. They all get the job done.
For beginners, it's hard to go wrong with the fastest attack and release allowed. That narrows you down to just adjusting the threshold and ratio. At this point, you need to experiment. In today's world, don't be afraid to push your ratio up to 5:1 or even 10:1 for genres like rap, rock, and pop.
Using a 5:1 ratio as an example, the quick explanation is that for every 5 dB that goes over the threshold you choose, only 1 dB comes out. It cuts the volume by that ratio. So if 10 dB goes beyond the threshold only 2 dB will come out.
You're turning down loud parts so they are closer to the quieter parts. This drastically increases the ability to latch on to what's being said and to have it be heard clearly. You can see why it's important to EQ first, so that bad frequencies aren't getting louder and louder.
De-Esser (Removing Sibilance)
This is half equalization and half compression. A de-esser plugin is actually a parametric EQ side-chained to a compressor.
Sibilance is when the microphone picks up tight blasts of air in the high frequencies when certain syllables are spoken. You know how sometimes whenever an "S" sound comes out, it'll be brain-numbing and piercingly loud? That's what a De-"S"-er gets rid of.
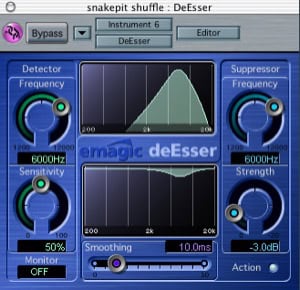
What a de-esser is going to help you do is sweep a tight boost around the sibilance range until you find the problem frequencies.
Then, and only if, those frequencies exceed a threshold you set will they be turned down in volume by the amount you choose. This turns down only the piercing S's versus removing them with an EQ across the entire take.
You won't always have to do this. Many times with the right singer, right mic, and right recording distance and angle, you'll never have this issue. But if you do, a de-esser is your friend.
Parallel Compression
Parallel compression is an advanced technique that allows you to do two things:
- Maintain dynamics while controlling them
- Send a more dynamic version of the vocals to the effects bus
You won't use this technique in a lot of genres today. But there are genres such as classical, folk, acoustic, and anything more refined of that nature where dynamics still play a huge role in the performance.
The situation is tricky... you want the performance to be understood and stable while allowing the singer and other instruments the ability to express themselves through dynamic manipulation, like strumming harder, smashing the keys harder, etc.
The solution is parallel compression. You're basically running two versions of your recording into two separate compressors or compressing only one and keeping the other fairly raw in dynamics.
Then you recombine the two, which serves to boost the volume of the quiet parts while allowing the louder parts to exist in fluctuation. You may still compress the more dynamic take some, but just not squash it completely like a pop recording.
The second reason to do this is that you can completely squash the main take that will appear in the mix while sending a more natural version to the effects bus. This means that your reverbs will react based on the natural performance without effecting the intelligibility (you still get to compress!).
Here, you're sneakily implying dynamics in the effects without having them exist in the main take. Pretty nifty trick for the right genres.
13) Time-Based Effects: Reverbs, Delays, & Echoes
There's not a lot to say to describe these various effects. If you don't know the difference between a reverb, delay, and an echo, pull up a plugin for each and find out.
I can't make a suggestion for you on how to apply them. It's all based on your mix. But what I can do is give you two tips on how to use them...
The first tip is to place these effects on separate busses from each other and separate from your main takes. There's no reason to apply them to the mixer channels of your main takes.
Not only is it harder to control their volume this way but you're going to end up freezing your software as your CPU tries to calculate a million effects.
The right way to do it is to create a bus, which is an extra mixer channel that exists solely to group main channels and handle effects. Once you have a bus, you can create a send from your main channels.
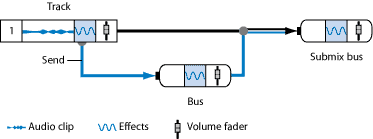
What's happening is that your normal mixer channel that you EQ'd and compressed is still going to the main out. You're not changing it at all. But what you are doing is creating a duplicate of it post-effects and sending it to another auxiliary channel that is called the bus.
There's a reason for this that goes beyond taxing your CPU too hard. Let's say you find the perfect reverb you want to apply to every instrument in your song.
That's not how it works in reality. If you have 10 reverbs going at once, you're going to have a mess.
If you recording a 5-piece band in a church and wanted to capture the reverb of the room, you'd set up one ambient microphone and do just that in one single microphone. There's only one reverb going naturally. The reverb is a product of the acoustic space, not the instrument.
So what you do is create a master reverb bus and send every instrument to it. With a send, you can adjust the volume of "how much" of the original track you're shooting over to the bus and then can still adjust the master volume of the send itself using the fader. What's even better is you can then EQ the bus itself.
My recommendation on a reverb bus is to set up an EQ on it and do a severe roll-off on the low-end and high-end, and then make the same cuts again that you would to make space for the lead vocals. Roll-off as high as 700 Hz on the low-end and 5 kHz on the high-end.
You won't believe the difference. You'll still have massive crystal clear clarity in your mix with a lush reverb. It doesn't have to be a trade off.
Pro-Tip: Bring your effects up in volume wherever you like them, then back off by 2-3 dB. Less is more and you'll over estimate how much is enough.
Otherwise, you can set up as many busses as you need for delays, echoes, flangers, and whatever else you choose to use.
14) Pitch Correction
And finally, as an extra tip that can be done at any point after recording is to apply pitch correction to your vocals. You'll need to fire up autotune and tweak its settings, which I don't recommend for any recording for any genre without using extreme care following our guide on how to use autotune.
You're far better off using a piece of software like Celemony Melodyne that lets you jump in to each note and apply correction only where needed.
Of course, with autotune you can automate when and where it fires off, but with Melodyne you're destructively editing the takes (which is good in this case because you're saving the originals anyways). You're not depending on autotune's algorithm to render properly.
Plugins don't always create the same final product on each render and changing the pitch of your lead vocal is not a place you want to take chances. You want to get it right and u0022freezeu0022 it to the track.
Jared H.
 Jared has surpassed his 20th year in the music industry. He acts as owner, editor, lead author, and web designer of LedgerNote, as well as co-author on all articles. He has released 4 independent albums and merchandise to global sales. He has also mixed, mastered, & recorded for countless independent artists. Learn more about Jared & The LN Team here.